
Airxcel RV air conditioners are reliable but can face issues. Troubleshooting these problems can save time and money.
Traveling in an RV offers freedom and adventure, but when your Airxcel air conditioner stops working, it can turn joy into frustration. Whether it’s a cooling issue or a strange noise, quick troubleshooting can restore comfort. This blog post will guide you through common problems and solutions.
With clear steps and helpful tips, you’ll be back to enjoying your RV trip in no time. Let’s dive into the world of Airxcel RV air conditioner troubleshooting, ensuring your travels remain cool and worry-free.
Common Issues
Experiencing issues with your Airxcel RV air conditioner can be frustrating. Identifying common problems helps in fixing them quickly. This section covers frequent issues you might face.
Unit Not Cooling
A common issue is the unit not cooling properly. Start by checking the thermostat settings. Ensure it’s set to ‘cool’ and not ‘heat’ or ‘fan’. Another possible cause is a dirty air filter. Clean or replace it to improve airflow. Low refrigerant levels can also affect cooling. If so, contact a professional to refill it. Inspect the condenser coils for dirt and debris. Clean them for better performance.
Strange Noises
Strange noises often signal a problem. Listen for rattling, buzzing, or squealing sounds. Loose parts can cause rattling noises. Tighten any loose screws or bolts. Buzzing might indicate an electrical issue. Check for frayed wires or burnt connections. Squealing sounds usually come from the fan motor. Lubricate the motor or replace it if necessary. Regular maintenance can help prevent these issues.
Initial Checks
Check the power supply and ensure the air conditioner is plugged in. Inspect the circuit breaker and fuses for any issues. Verify the thermostat settings are correct.
When your Airxcel RV air conditioner isn’t working as expected, it can turn a pleasant trip into a sweaty ordeal. Before you call a professional, there are some initial checks you can do to potentially fix the issue yourself. These steps can save you time and money, and maybe even your vacation!
Power Supply
First, check the power supply. Ensure your RV is connected to a reliable power source. Sometimes, the issue might be as simple as a loose plug or a tripped breaker.
Inspect the power cord for any visible damage. If the cord looks worn out, it might be time for a replacement.
Also, verify that your RV’s main breaker hasn’t tripped. A quick reset might be all you need to get your air conditioner running again.
Thermostat Settings
Next, take a look at your thermostat settings. Set the thermostat to “cool” and lower the temperature setting. It’s easy to overlook this step, especially if you’ve been adjusting the thermostat frequently.
Ensure the thermostat is getting power. If it’s battery-operated, replacing the batteries can often resolve issues.
Check if the thermostat is clean. Dust or debris can interfere with its operation. Gently clean it with a soft brush or cloth.
By performing these initial checks, you can address common issues that might be preventing your Airxcel RV air conditioner from working properly. Have you ever fixed your air conditioner with a simple check? Share your experiences in the comments!
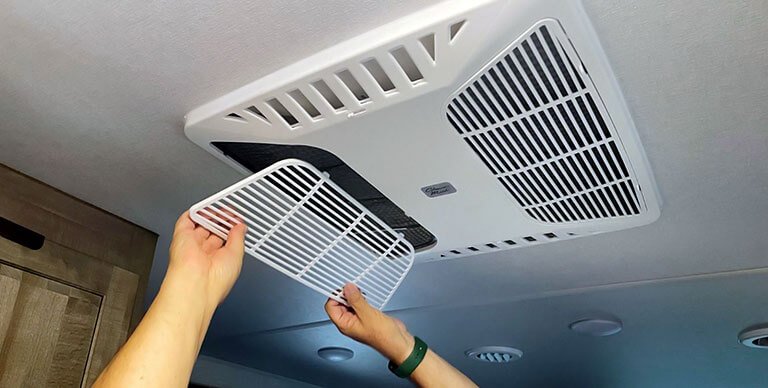
Cleaning The Air Filter
Keeping the air filter of your Airxcel RV air conditioner clean is crucial for its efficiency. A dirty filter can restrict airflow, causing the unit to work harder and ultimately leading to higher energy bills. Regular maintenance of the air filter ensures a comfortable living space in your RV.
Removing The Filter
First, make sure the air conditioner is turned off. Safety always comes first. Next, locate the air filter, usually found behind a grille or panel on the front of the unit.
Use a screwdriver if necessary to remove the panel. Carefully take out the filter to avoid any dust or debris falling into the unit. If this is your first time, check the user manual for specific instructions.
Cleaning Methods
Once the filter is out, you have a few cleaning options. If the filter is only slightly dirty, a quick vacuum can do the trick. Use the brush attachment for best results.
If the filter is heavily soiled, wash it with warm, soapy water. Gently scrub with a soft brush to remove all dirt. Rinse thoroughly and let it dry completely before reinserting it back into the unit.
Regular cleaning can extend the life of your filter. Aim to clean it every 30 days during heavy use seasons. Have you ever noticed a decline in your air conditioner’s performance and realized it was just a dirty filter?
Keeping the filter clean not only improves air quality but also keeps your unit running efficiently. Don’t let a simple task like this slip through the cracks. Your comfort depends on it.
Inspecting The Coils
Inspecting the coils of your Airxcel RV air conditioner is a crucial part of troubleshooting. Clean coils ensure the unit runs efficiently, providing you with a cool, comfortable environment during your travels. Let’s break down how to inspect the evaporator and condenser coils.
Evaporator Coils
Evaporator coils are located inside your RV, usually behind the air filter. They absorb heat from the air inside your RV and cool it down. Over time, these coils can gather dust and dirt, reducing their efficiency.
Start by turning off the air conditioner and unplugging the unit. Remove the air filter to access the evaporator coils. If you notice a layer of grime, it’s time for a clean-up.
Use a soft brush or a vacuum with a brush attachment to gently clean the coils. Be careful not to damage the delicate fins. For stubborn dirt, a coil cleaner specifically designed for evaporator coils can be helpful.
Have you ever noticed reduced airflow or less cooling in your RV? Dirty evaporator coils might be the culprit. Regular inspection and cleaning can prevent these issues and improve your air conditioner’s performance.
Condenser Coils
Condenser coils are located outside your RV. They release the heat absorbed by the evaporator coils to the outside air. Like evaporator coils, condenser coils can also get dirty and need regular maintenance.
First, turn off the air conditioner and unplug the unit. Locate the condenser coils, usually found at the back of the unit. Inspect them for dirt, leaves, or other debris.
A garden hose can be effective for cleaning condenser coils. Use a gentle spray to wash away the debris. Avoid using high pressure, as it can bend the fins and reduce efficiency. You can also use a coil cleaner if necessary.
Have you experienced your air conditioner shutting off unexpectedly or struggling to cool your RV? Dirty condenser coils might be the reason. Regular cleaning can help maintain optimal performance and prevent unexpected breakdowns.
Inspecting your coils regularly is a simple yet effective way to keep your Airxcel RV air conditioner running smoothly. Clean coils lead to better airflow, improved cooling, and a more enjoyable RV experience. Have you checked your coils lately?
Checking The Fan
Is your Airxcel RV air conditioner not cooling properly? The fan might be the problem. This section will guide you through checking the fan. We will look at the fan blades and motor function. Follow these steps to troubleshoot effectively.
Fan Blades
First, inspect the fan blades. Turn off the power to the air conditioner. Remove the cover to access the fan. Check if the blades are clean and free of debris. Dirt on the blades can slow them down. Clean the blades with a damp cloth. Ensure the blades are not bent. Bent blades can cause imbalance. If they are damaged, replace them.
Motor Function
Next, check the motor function. Turn the fan by hand. It should spin freely. If it feels tight, the motor might be the issue. Listen for any unusual noises. A loud motor can indicate a problem. Check the motor connections. Loose wires can affect performance. Secure any loose connections. If the motor is still not working, it may need replacement.
Examining The Ducts
Examining the ducts can help identify issues with your Airxcel RV air conditioner. Regular checks ensure efficient cooling and prevent costly repairs.
When your Airxcel RV air conditioner isn’t working as expected, examining the ducts can often reveal the root of the problem. Properly functioning ducts are essential for efficient air circulation. Let’s dive into some common issues you might encounter and how to address them.
Duct Blockages
Duct blockages are a frequent cause of poor air flow. Debris such as dust, leaves, or even small pests can clog your ducts.
I remember last summer, my RV’s air conditioner was barely cooling. On checking, I found a bird’s nest partially obstructing the duct!
Regularly inspect and clean your ducts. Use a flashlight to look deep inside and a vacuum with a hose attachment for thorough cleaning.
Have you noticed any unusual noises or reduced airflow? These are telltale signs of blockages.
Seal Integrity
Seal integrity is crucial for maintaining the efficiency of your air conditioner. If the seals around your ducts are compromised, cool air can escape, reducing overall performance.
Once, I noticed my RV wasn’t cooling evenly. Upon closer inspection, I found a seal had come loose. A quick fix with duct tape made a significant difference.
Check all seals for any signs of wear or damage. Replace or repair them as needed. This simple step can save you from bigger issues down the road.
Are you experiencing uneven cooling in your RV? It might be time to check those seals.
Regular maintenance and prompt attention to issues can keep your Airxcel RV air conditioner running smoothly. So, next time you’re troubleshooting, don’t forget to examine those ducts!
Refrigerant Levels
Maintaining proper refrigerant levels in your Airxcel RV air conditioner is essential. Low levels can cause poor cooling performance. Regular checks ensure efficient operation and comfort on your travels.
Refrigerant levels play a critical role in the performance of your Airxcel RV air conditioner. Maintaining the right refrigerant level ensures optimal cooling efficiency and extends the lifespan of your unit. Whether you’re a seasoned RV enthusiast or new to RVing, understanding refrigerant levels can save you from many headaches on the road.
Signs Of Low Refrigerant
Low refrigerant levels can cause your air conditioner to underperform. You might notice that the air isn’t as cool as it used to be. Another sign is the unit running continuously without reaching the desired temperature.
In some cases, you may even hear a hissing or bubbling noise. This could indicate a refrigerant leak. If you suspect low refrigerant levels, it’s crucial to act quickly.
Check your unit’s pressure gauges if you have the tools. Low readings can confirm your suspicions. Always consult your RV’s manual for specific guidelines.
Recharging Refrigerant
Recharging the refrigerant isn’t something you should do lightly. It’s a task best left to professionals unless you have proper training. Incorrect handling can damage the unit and even void your warranty.
If you decide to proceed, make sure you have the correct type of refrigerant. Using the wrong type can cause severe issues. Follow the manufacturer’s instructions to the letter.
Always wear protective gear when dealing with refrigerant. It’s harmful if inhaled or comes into contact with skin. Safety should always be your top priority.
Recharging might solve the problem temporarily, but frequent low levels indicate a leak. Consider getting a professional inspection to fix the underlying issue. This proactive approach can save you time and money in the long run.
Have you ever had to recharge your RV’s air conditioner? What steps did you take to ensure you were doing it safely? Share your experiences and tips in the comments below.
Professional Help
When dealing with an Airxcel RV air conditioner, you might encounter some issues that are beyond your ability to fix. In such cases, seeking professional help is not just a good idea, it’s a necessity. Professional technicians have the expertise and tools to diagnose and repair complex problems efficiently, ensuring your air conditioner runs smoothly again.
When To Call A Technician
Sometimes, the problems with your Airxcel RV air conditioner can be more complicated than a simple DIY fix. If you notice persistent issues like strange noises, continuous leaks, or the unit not cooling effectively, it’s time to call a technician. These symptoms can indicate deeper mechanical or electrical problems that require professional expertise.
Moreover, if you have already tried basic troubleshooting steps such as cleaning filters, checking for blockages, and resetting the system, but the problem persists, it’s wise to seek professional help. Attempting to fix advanced issues without proper knowledge can lead to further damage and higher repair costs.
Remember, your safety is paramount. Issues involving electrical components or refrigerant should always be handled by a certified professional to avoid potential hazards.
Choosing A Reliable Service
Finding a reliable service for your Airxcel RV air conditioner repair is crucial. Start by checking reviews and ratings online. Positive feedback from other RV owners can guide you toward trustworthy technicians.
Ask for recommendations from fellow RV owners or friends who have faced similar issues. Personal experiences can provide valuable insights into the reliability and efficiency of a service provider.
Additionally, ensure the technician is certified and experienced in handling RV air conditioners. Certification not only guarantees their expertise but also assures you that they follow industry standards and safety protocols.
Don’t hesitate to ask for a detailed quote before any work begins. This can help you avoid unexpected costs and ensure the service fits your budget. Transparency in pricing is a good indicator of a reliable service.
In the end, addressing issues promptly and seeking professional help when needed can extend the lifespan of your Airxcel RV air conditioner, keeping your travels comfortable and worry-free. Have you ever had an experience where professional help saved the day? Share your story in the comments below!
Frequently Asked Questions
Where Is The Reset Button On An Rv Air Conditioner?
The reset button on an RV air conditioner is usually located behind the unit’s control panel or on the unit itself. Check the user manual for the exact location and instructions.
Why Is My Rv Ac Not Responding To The Thermostat?
The RV AC might not respond to the thermostat due to dead batteries, loose connections, or a faulty thermostat. Check and replace batteries, tighten connections, or consult a professional for repairs.
Why Is My Air Conditioner Turning On But Not Cooling?
Your air conditioner may not be cooling due to a dirty filter, low refrigerant, or a malfunctioning compressor. Check these components to diagnose the issue.
Why Is My Rv Ac Not Blowing Cold Air?
Your RV AC may not blow cold air due to low refrigerant levels, a dirty filter, or a faulty compressor. Check for blockages, clean filters, and ensure proper maintenance. If problems persist, consult a professional technician.
How Do I Reset My Airxcel Rv Air Conditioner?
To reset your Airxcel RV air conditioner, turn off the power, wait 5 minutes, then turn it back on.
Conclusion
Troubleshooting your Airxcel RV air conditioner can seem challenging. Follow basic steps first. Check power supply. Inspect filters for dirt. Examine thermostat settings. Look for leaks or blockages. Listen for unusual noises. Regular maintenance helps avoid issues. Professional help may be needed sometimes.
Keep your RV cool and comfortable. Enjoy your travels without air conditioning worries. Happy camping!