
First, ensure the water heater is receiving power. Next, check for any blockages in the gas lines or exhaust vents.
Atwood RV water heaters are essential for a comfortable trip. Troubleshooting common issues can save time and frustration. Begin by verifying that the unit has power. Inspect the circuit breaker and fuses. Confirm that the propane tank is full and the gas valve is open.
Examine the gas lines for blockages or leaks. Clean the burner tube and check the igniter for proper operation. Look at the thermostat and control board for faults. Regular maintenance can prevent many problems. Always refer to the user manual for specific instructions. If issues persist, seek professional help.
Common Issues With Atwood Rv Water Heaters
Atwood RV water heaters are reliable, yet sometimes they have problems. Knowing common issues helps in quick troubleshooting. The two main issues are pilot light problems and inconsistent water temperatures.
Pilot Light Problems
The pilot light is crucial for your water heater. It might go out often or not light at all. These are common pilot light problems:
- Dirty Burner: Dust can block the burner, stopping the pilot light.
- Weak Thermocouple: A weak thermocouple fails to detect the flame.
- Gas Supply Issues: Low gas pressure can affect the pilot light.
Cleaning the burner and checking the gas supply can fix many issues.
Inconsistent Water Temperatures
Inconsistent water temperatures can be frustrating. The water might be too hot or too cold. Here are common reasons:
- Thermostat Issues: A faulty thermostat can cause temperature swings.
- Mineral Build-Up: Minerals can block heating elements, affecting temperature.
- Electrical Problems: Loose wires or faulty connections can cause inconsistent heating.
Regular maintenance can help prevent these problems. Check the thermostat and clean the tank to avoid issues.
Initial Inspection Steps
When dealing with an Atwood RV water heater, starting with the initial inspection steps is crucial. This helps identify common issues and ensures proper functioning. Here are the key steps to follow.
Safety Precautions
Safety is the first priority. Always turn off the power supply. Ensure the propane valve is closed. Wear safety gloves and goggles to protect yourself. Make sure the area is well-ventilated. These precautions help prevent accidents.
Tools And Materials Needed
Before beginning, gather the necessary tools and materials. This ensures a smooth inspection process.
- Multimeter
- Wrench set
- Screwdrivers
- Flashlight
- Owner’s manual
Inspection Steps
Begin by visually inspecting the heater unit. Look for signs of wear and tear.
- Check for leaks around the unit.
- Inspect the burner assembly.
- Examine the electrical connections.
Next, use a multimeter to test the thermostat and heating element. Ensure they have proper readings.
- Set the multimeter to the correct setting.
- Attach the probes to the thermostat terminals.
- Record the readings.
If you find any faulty components, note them down. This helps in the repair process.
| Component | Inspection Criteria |
|---|---|
| Thermostat | Proper voltage readings |
| Heating Element | No visible damage |
| Burner Assembly | Clean and rust-free |
By following these initial inspection steps, you can identify potential issues early. This ensures your Atwood RV water heater remains in top condition.
Atwood RV Water Heater Troubleshooting The Pilot Light
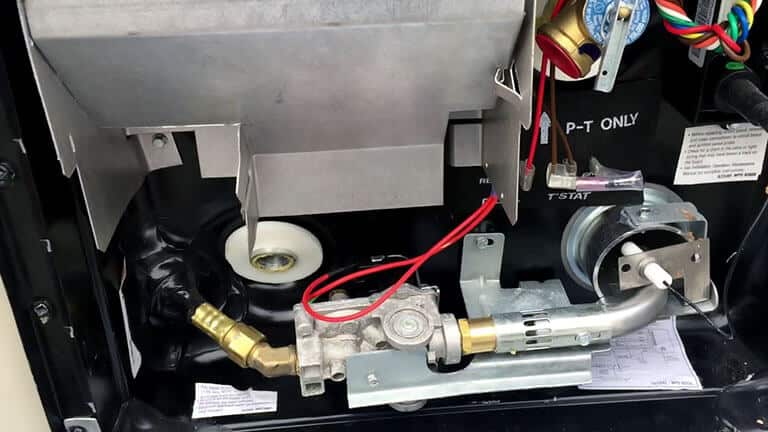
Having issues with your Atwood RV water heater’s pilot light? This guide will help. Follow these steps to troubleshoot and fix your pilot light problems.
Checking The Gas Supply
First, ensure the gas supply to your RV water heater is working. Check the gas valve. It should be in the “ON” position.
Next, verify the propane tank. Is it full? If not, refill it. Also, inspect the gas lines for any visible damage or leaks. Use a soapy water solution to detect leaks. Bubbles indicate a leak.
| Step | Action |
|---|---|
| 1 | Check gas valve position |
| 2 | Verify propane tank level |
| 3 | Inspect gas lines for leaks |
Cleaning The Pilot Assembly
If the gas supply is fine, the next step is to clean the pilot assembly. Dirt and debris can block the pilot light. Start by turning off the gas supply.
Use a small brush or compressed air to clean the pilot tube. Make sure you remove all dirt and debris. Also, check the orifice for blockages. A thin wire can help clear it.
- Turn off the gas supply
- Use a brush or compressed air to clean
- Clear the orifice with a thin wire
After cleaning, turn the gas back on. Try lighting the pilot light again. If it still doesn’t work, you might need to replace the pilot assembly.
Dealing With Water Temperature Fluctuations
Water temperature fluctuations can be frustrating. They can make showers uncomfortable. Understanding how to fix this issue is key. Here’s a guide to help you troubleshoot your Atwood RV water heater.
Adjusting The Thermostat
The thermostat controls water temperature. If temperatures vary, adjust the thermostat.
- Locate the thermostat on the water heater.
- Use a screwdriver to remove the cover.
- Turn the adjustment dial to your preferred temperature.
Check if the temperature stabilizes. If not, proceed to the next step.
Inspecting The Burner Flame
A proper burner flame is crucial. An inconsistent flame can cause temperature fluctuations.
| Step | Action |
|---|---|
| 1 | Turn off the water heater. |
| 2 | Open the burner access panel. |
| 3 | Inspect the burner flame. It should be blue and steady. |
| 4 | If the flame is yellow or flickering, clean the burner. |
A clean burner ensures efficient heating. This should resolve temperature fluctuations.
Solving Electric Heating Element Issues
Is your Atwood RV water heater not heating? The electric heating element might be the culprit. Understanding and solving electric heating element issues can restore hot water in your RV.
Testing The Heating Element
To begin, you need a multimeter. This tool helps check the heating element. Follow these simple steps:
- Turn off the power to your water heater.
- Remove the access panel to expose the heating element.
- Disconnect the wires attached to the heating element.
- Set your multimeter to the ohms setting.
- Place the multimeter probes on the heating element terminals.
If the multimeter reads between 10-16 ohms, the element is fine. A reading outside this range means the element is faulty.
Replacing A Faulty Element
If the heating element is faulty, replacing it is necessary. Gather these tools:
- New heating element
- Socket wrench
- Teflon tape
- Bucket
Follow these steps to replace the faulty element:
- Turn off the water supply to the heater.
- Drain the water heater by opening the drain valve.
- Remove the old heating element using the socket wrench.
- Wrap Teflon tape around the threads of the new element.
- Install the new heating element and tighten securely.
- Reconnect the wires to the new heating element.
- Close the drain valve and refill the heater with water.
- Turn on the power and test the heater.
Replacing the heating element should restore your RV water heater’s function. Always ensure safety measures while handling electrical components.
Addressing Water Flow Problems
Water flow problems in your Atwood RV water heater can be frustrating. Poor flow affects showering, washing dishes, and more. This section helps you fix these issues quickly and easily.
Cleaning The Tank
A dirty tank reduces water flow. Cleaning the tank can solve this.
- Turn off the water heater and let it cool.
- Drain the tank completely.
- Use a tank cleaning wand to remove debris.
- Rinse the tank with fresh water.
Do this regularly to maintain good water flow.
Checking For Obstructions
Obstructions in the water lines can also cause problems. Check these areas:
- Inlet Screen: Remove and clean the inlet screen.
- Water Lines: Inspect water lines for kinks or blockages.
- Check Valves: Ensure check valves are working correctly.
Clear any obstructions to restore proper water flow.
Preventive Maintenance Tips
Regular maintenance of your Atwood RV water heater ensures its efficiency and longevity. Preventive maintenance can save you from unexpected breakdowns and costly repairs. Let’s explore some key maintenance tips to keep your water heater in top shape.
Regular Cleaning
Regular cleaning of your Atwood RV water heater is crucial. Dirt and debris can accumulate over time, affecting performance. Follow these steps for thorough cleaning:
- Turn off the water heater and allow it to cool.
- Drain the water from the heater tank.
- Use a soft brush to clean the exterior surfaces.
- Remove and clean the burner assembly with a soft cloth.
- Flush the tank with fresh water to remove sediment.
Regular cleaning prevents blockages and ensures efficient heating.
Anode Rod Replacement
The anode rod in your Atwood RV water heater protects the tank from corrosion. Replacing it regularly can extend the life of your heater. Follow these steps for anode rod replacement:
- Turn off the water heater and disconnect the power supply.
- Locate the anode rod on the top of the tank.
- Use a socket wrench to remove the old anode rod.
- Insert a new anode rod and tighten it securely.
- Reconnect the power supply and turn on the water heater.
Regular anode rod replacement helps prevent tank corrosion and ensures reliable operation.
When To Seek Professional Help
Atwood RV water heaters are reliable, but sometimes problems arise. Knowing when to seek professional help is crucial. Some issues are too complex or unsafe to handle alone. This section will guide you on recognizing complex issues and finding qualified technicians.
Recognizing Complex Issues
Complex issues with your Atwood RV water heater require professional attention. Here are some signs to watch for:
- Persistent Leaks: If your water heater keeps leaking, it needs expert repair.
- No Hot Water: If there’s no hot water, it could be a thermostat or heating element issue.
- Unusual Noises: Strange sounds may indicate serious problems inside the heater.
- Burnt Smell: A burnt smell signals electrical issues, which are dangerous.
- Frequent Pilot Light Issues: Pilot light going out often means a deeper problem.
Finding Qualified Technicians
Finding the right technician ensures your RV water heater is fixed correctly. Here are some tips to find a qualified professional:
- Check Certifications: Ensure the technician has RV-specific certifications.
- Read Reviews: Look for reviews from other RV owners.
- Ask for References: Get references from friends or RV communities.
- Verify Experience: Choose technicians with experience in Atwood water heaters.
For more detailed information, refer to the table below:
| Issue | Potential Cause | Why Seek Professional Help? |
|---|---|---|
| Persistent Leaks | Faulty valves or connections | May require specialized tools and parts |
| No Hot Water | Thermostat or heating element failure | Involves electrical components |
| Unusual Noises | Debris or internal damage | Needs internal inspection |
| Burnt Smell | Electrical issues | Potential fire hazard |
| Frequent Pilot Light Issues | Gas supply or ignition problems | Gas-related issues can be dangerous |
Frequently Asked Questions
Why Is My Atwood Rv Water Heater Not Heating?
It may be due to a faulty thermostat, heating element, or lack of power supply.
How Do I Reset My Atwood Rv Water Heater?
Locate the reset button on the water heater, press it, and hold for a few seconds.
What Causes Atwood Water Heater To Leak?
Leaking can be due to a damaged valve, loose connections, or a cracked tank.
How Often Should I Service My Atwood Water Heater?
Service your Atwood water heater annually to ensure optimal performance and longevity.
Why Is My Water Heater Making Noise?
Noise often indicates sediment buildup, which can be resolved by flushing the water heater tank.
Conclusion
Mastering Atwood RV water heater troubleshooting ensures a comfortable trip. Follow our guide for quick and easy fixes. Regular maintenance prevents future issues and extends your heater’s life. Stay informed and enjoy hot water on all your adventures. Happy traveling and safe journeys!