
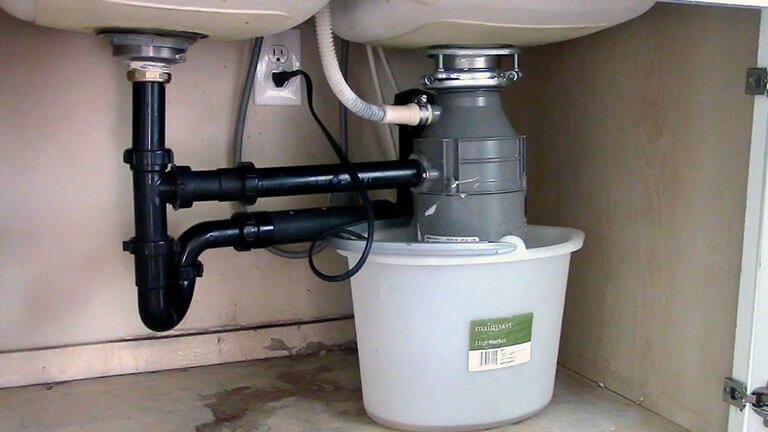
To troubleshoot a Badger Insinkerator, first ensure the unit is properly plugged in. Reset the unit using the red button under the sink.
Badger Insinkerators are reliable kitchen appliances, but occasional issues may arise. Common problems include clogs, leaks, and power failures. Understanding basic troubleshooting steps can save time and money. Always start by checking for obvious issues like power connections and obstructions.
Resetting the unit often resolves minor problems. If these steps don’t work, consult the user manual or contact customer support. Regular maintenance, like cleaning and avoiding hard items, can prevent future issues. By following these tips, you can keep your Badger Insinkerator running smoothly and efficiently.
Introduction To Badger Insinkerator Issues
The Badger Insinkerator is a popular garbage disposal unit. It helps in disposing of kitchen waste efficiently. But, like any appliance, it can face issues. Understanding these problems can help in fixing them quickly. This blog will guide you through common signs and benefits of quick troubleshooting.
Common Signs Of Disposal Problems
There are several signs that your Badger Insinkerator might have problems. Knowing these signs can help you act fast:
- Strange noises: If your disposal makes unusual sounds, it could be a problem.
- Slow draining: Water draining slowly might indicate a clog.
- Bad smells: Persistent odors suggest trapped food particles.
- Leaks: Leaks under the sink can signal a worn-out seal.
- No power: If the unit won’t turn on, it might be an electrical issue.
Benefits Of Quick Troubleshooting
Quick troubleshooting has many advantages. Here are some benefits:
- Save money: Fixing issues early can prevent costly repairs.
- Extend lifespan: Proper maintenance helps your unit last longer.
- Maintain hygiene: Keeping your disposal in good shape prevents bad smells.
- Ensure safety: Addressing problems quickly avoids potential hazards.
- Improve efficiency: A well-maintained disposal works better and faster.
By recognizing signs and troubleshooting early, you can keep your Badger Insinkerator running smoothly.
Safety First: Preparing For Repair
Before fixing a Badger Insinkerator, ensure your safety. Proper preparation is key. This section covers crucial steps for safe repair.
Turning Off The Power
First, turn off the power. This is essential to prevent electrical accidents. Locate the circuit breaker linked to your Insinkerator. Switch it off. Confirm the power is off by testing the unit. Try to turn on the Insinkerator. If it doesn’t work, the power is off.
Essential Tools For The Job
Gather the necessary tools. Having the right tools makes the job easier. Here’s a list of essential tools:
- Allen wrench: Commonly used for unjamming the disposal.
- Plunger: Helps clear clogs in the disposal.
- Screwdriver: Needed for removing screws.
- Flashlight: Provides better visibility inside the unit.
- Pliers: Useful for gripping and turning small parts.
- Safety gloves: Protect your hands from sharp edges.
Having these tools ready ensures a smooth repair process. Safety gloves are particularly important. They protect your hands from cuts and injuries.
Jamming Issues: Easy Solutions
Having trouble with your Badger Insinkerator? Jamming is a common issue. Don’t worry, it’s easy to fix. Follow these steps to get your garbage disposal running smoothly again.
Identifying A Jam
First, you need to identify if your Insinkerator is jammed. Here are some signs:
- The motor hums but the blades don’t spin.
- There’s a grinding noise without any food processing.
- Water drains slowly from the sink.
If you notice any of these signs, your unit is likely jammed.
Steps To Clear The Jam
Follow these simple steps to clear a jammed Badger Insinkerator:
- Turn off the power: Unplug the unit or turn off the circuit breaker.
- Use a flashlight: Look inside the disposal to find the jam.
- Insert an Allen wrench: Use the wrench to turn the blades manually. Insert it into the hole at the bottom of the unit. Turn it back and forth to free the jam.
- Remove debris: Use pliers or tongs to remove any visible objects.
- Restore power: Plug the unit back in or turn on the circuit breaker.
- Test the disposal: Run water and turn on the unit to see if it works.
If these steps don’t fix the issue, contact a professional for help.
Power Problems: What To Check
Experiencing power problems with your Badger Insinkerator can be frustrating. Knowing what to check can save you time and money. Let’s explore some common power issues and how to troubleshoot them.
Reset Button Function
The reset button on your Badger Insinkerator is a crucial component. It helps resolve minor electrical issues. Locate the button on the bottom of the unit. It is usually red.
Press the reset button firmly. If it stays in, the issue might be resolved. If it pops out again, there might be a deeper problem. This could indicate a jam or an electrical fault.
Circuit Breaker Troubleshooting
If pressing the reset button doesn’t work, check the circuit breaker. Locate your home’s breaker panel. Find the switch that controls the Insinkerator.
Ensure the breaker is not tripped. If it is, reset it by flipping the switch off and then on. Sometimes, power surges can trip the breaker.
If the breaker trips again immediately, there may be a short circuit. You might need to call a professional. Below is a simple table to guide you through the steps:
| Step | Action |
|---|---|
| 1 | Locate the breaker panel |
| 2 | Find the Insinkerator switch |
| 3 | Check if the breaker is tripped |
| 4 | Reset the breaker |
| 5 | Call a professional if it trips again |
Noise Complaints: Silencing Your Insinkerator
Is your Badger Insinkerator making strange noises? These sounds can be annoying and worrying. But don’t worry, we can help you understand and fix these problems.
Types Of Noises And Their Meanings
Different noises mean different problems. Here are some common ones:
- Grinding noise: This is normal when the blades are working.
- Loud humming: This often means something is stuck.
- Rattling sound: This could be caused by loose parts.
- Clanking noise: Metal objects might be inside.
Quick Fixes For Common Noises
Try these simple solutions to fix your Insinkerator:
- Turn off the unit: Safety first! Always turn off the power.
- Check for blockages: Look inside and remove any stuck items.
- Tighten loose parts: Use a wrench to secure any loose screws.
- Clear the blades: Use tongs to remove hard objects from the blades.
- Reset the unit: Press the reset button on the bottom of the unit.
By following these steps, you can enjoy a quiet Insinkerator once again. Remember, regular maintenance is key to keeping your unit running smoothly.
Leakage Woes: Finding And Fixing
Experiencing leaks with your Badger Insinkerator can be frustrating. This guide will help you pinpoint and fix the problem. Follow these steps to get your appliance working smoothly again.
Locating The Source Of A Leak
First, check the sink flange. Ensure it’s tightly connected. Look for any signs of water around the flange. Next, inspect the discharge pipe. A loose or damaged pipe can cause leaks. Examine the area where the discharge pipe connects to the disposer. Finally, check the bottom of the Insinkerator. If water drips from the bottom, the internal seal may be worn out.
Sealing Leaks Effectively
Once you find the source, it’s time to seal the leak. Use a pipe wrench to tighten the sink flange. Apply plumber’s putty around the flange for an added seal. For the discharge pipe, ensure all connections are snug. Replace any worn-out gaskets or washers. If the leak is from the bottom of the unit, you might need a new disposal unit. Internal seals are difficult to replace.
| Leak Source | Fix |
|---|---|
| Sink Flange | Tighten connections, apply plumber’s putty |
| Discharge Pipe | Tighten connections, replace gaskets |
| Bottom of Unit | Consider replacing the disposal unit |
Follow these steps to ensure your Badger Insinkerator remains leak-free. Regular maintenance can prevent future problems. Happy fixing!
Odor Issues: Freshening Up Your Disposal
Your Badger Insinkerator can develop unpleasant smells over time. These odors can make your kitchen uncomfortable. Let’s explore the causes and solutions.
Causes Of Unpleasant Smells
Several factors can cause bad smells in your disposal:
- Food Particles: Food can get stuck and rot.
- Grease Build-up: Grease can coat the pipes.
- Overlooked Cleaning: Regular cleaning might be skipped.
- Stagnant Water: Water can become stagnant and smell.
Deodorizing Methods That Work
Here are proven methods to freshen up your disposal:
- Ice and Salt: Grind ice cubes with salt. This cleans the blades.
- Baking Soda and Vinegar: Pour baking soda and then vinegar. Let it fizz and sit.
- Citrus Peels: Grind lemon or orange peels for a fresh scent.
- Hot Water and Dish Soap: Run hot water with a squirt of dish soap.
These methods will help keep your disposal smelling fresh. Regular maintenance is key.
Routine Maintenance: Preventing Future Problems
Maintaining your Badger Insinkerator can prevent future problems. Routine care ensures it works efficiently and lasts longer. Let’s explore some effective practices.
Cleaning Practices For Longevity
Regular cleaning keeps your Badger Insinkerator running smoothly. Follow these steps:
- Run cold water before and after use. This helps flush out debris.
- Use a mix of ice cubes and salt monthly. This cleans the grinding chamber.
- Pour some baking soda and vinegar weekly. This helps remove odors.
Avoid grinding these items:
| Do Not Grind | Reason |
|---|---|
| Grease | Clogs the pipes |
| Fibrous foods (like celery) | Wraps around blades |
| Large bones | Damages the unit |
When To Call A Professional
Some issues need a professional’s touch. Call an expert if you face these problems:
- The unit hums but doesn’t grind.
- Persistent bad odors despite cleaning.
- Water leaks from the Insinkerator.
A professional ensures safe and effective repairs. This helps avoid further damage.
Upgrade Considerations: When To Replace
- Garbage disposals are essential kitchen tools, but they don’t last forever. Sometimes, it’s better to upgrade your Badger Insinkerator rather than fix it. Knowing when to replace your unit can save time and money. Below are key signs and tips for choosing a new model.
Signs That Indicate Replacement
- Frequent Repairs: If your Insinkerator needs constant fixes, it may be time to upgrade. Frequent repairs can add up in cost.
- Unusual Noises: Strange sounds like grinding, rattling, or humming could mean internal parts are failing.
- Persistent Clogs: Regular clogs, even with proper use, indicate the unit can’t handle waste efficiently.
- Water Leaks: Leaks from the unit or nearby plumbing suggest significant wear and tear.
- Bad Odors: Persistent bad smells, even after cleaning, can signal internal damage or build-up.
- Age of the Unit: Most garbage disposals last about 10-12 years. If yours is older, consider a replacement.
Choosing A New Insinkerator Model
When selecting a new Insinkerator, consider these factors:
- Power Rating: Choose a model with adequate horsepower. For a small household, 1/2 HP models are sufficient. For larger families, opt for 3/4 HP or 1 HP units.
- Noise Levels: Modern units come with noise-reducing technology. Look for models that offer quieter operation.
- Grinding Stages: More grinding stages mean better waste breakdown. Two or three-stage grinders handle tougher waste more efficiently.
- Installation Compatibility: Ensure the new unit fits your existing plumbing and sink setup. Check for easy installation features like quick-lock mounting systems.
- Warranty: A good warranty can save on future repair costs. Look for models with longer warranty periods.
Upgrading your Badger Insinkerator can improve kitchen efficiency and hygiene. By recognizing the signs of a failing unit and selecting the right replacement, you ensure smooth kitchen operations.
Conclusion: Ensuring Continuous Operation
Ensuring your Badger Insinkerator runs smoothly involves regular checks and maintenance. Addressing issues promptly can save time and money. Below are key tips to keep your unit in top shape.
Recap Of Key Troubleshooting Tips
- Power Issues: Check if the unit is plugged in. Reset the unit using the red button located at the bottom.
- Clogs: Use a hex wrench to dislodge jams. Avoid using chemical drain cleaners.
- Leaks: Inspect seals and gaskets for wear and replace if necessary. Ensure that the mounting assembly is tight and secure.
- Strange Noises: Remove any foreign objects from the grinding chamber. Tighten any loose parts.
- Slow Drainage: Clean the P-trap and drain pipe. Use a mixture of baking soda and vinegar to clear minor clogs.
The Importance Of Regular Maintenance
Regular maintenance is key to the longevity of your Badger Insinkerator. It helps in early detection of potential issues and prevents costly repairs.
| Task | Frequency |
|---|---|
| Clean the unit | Weekly |
| Inspect seals and gaskets | Monthly |
| Check for leaks | Quarterly |
| Remove debris | As needed |
Following these maintenance tips ensures your unit operates smoothly. Regularly cleaning the unit prevents buildup and clogs. Inspecting seals and gaskets ensures there are no leaks. Checking for leaks and removing debris helps in maintaining efficiency.
Frequently Asked Questions
How To Reset Badger Insinkerator?
Locate the reset button underneath the unit. Press it to reset the Insinkerator.
Why Is My Badger Insinkerator Leaking?
Leaks may come from loose connections or worn-out seals. Check and tighten connections or replace seals if necessary.
Why Is Badger Insinkerator Not Working?
Check for power supply issues or a tripped breaker. Ensure the reset button is pressed.
How To Unclog Badger Insinkerator?
Turn off the unit and use a plunger or a wrench to remove blockages. Avoid chemical drain cleaners.
What Causes Badger Insinkerator Noise?
Noise can result from foreign objects inside. Turn off and remove objects carefully to reduce noise.
Conclusion
Troubleshooting your Badger Insinkerator can be straightforward with the right guidance. Address common issues quickly to keep your kitchen running smoothly. Regular maintenance can prevent most problems. If issues persist, consult the manual or contact a professional. Proper care ensures your Insinkerator serves you well for years.