
To troubleshoot a GE refrigerator control board, first check for error codes on the display panel. Inspect the control board for visible signs of damage.
A malfunctioning control board can cause various issues in a GE refrigerator, from cooling problems to unresponsive displays. Identifying error codes can help pinpoint the problem. Common signs of a faulty control board include the refrigerator not cooling, unusual noises, or the display not working.
Before replacing the control board, check all connections and ensure no other components are at fault. Using a multimeter can help verify if the control board is receiving power. If you confirm the control board is defective, replacing it might resolve the issues. Always consult the refrigerator’s manual for specific troubleshooting steps.
Introduction To Ge Refrigerator Control Board Issues
The control board in your GE refrigerator is its brain. It manages all the functions and settings. Any issues with the control board can lead to various problems. Understanding these issues can help in quick troubleshooting.
Signs Of Control Board Failure
Identifying the signs of control board failure is crucial. Here are some common symptoms:
- Refrigerator not cooling: Your fridge might not cool properly.
- Unusual noises: Strange sounds could come from the fridge.
- Display problems: The control panel might show errors.
- Inconsistent temperatures: Temperature settings might fluctuate.
- Unresponsive buttons: The buttons might not work.
Importance Of Prompt Troubleshooting
Prompt troubleshooting is vital for your GE refrigerator. Here’s why:
| Reason | Impact |
|---|---|
| Food safety: | Prevents food spoilage. |
| Efficiency: | Keeps energy usage low. |
| Cost savings: | Avoids costly repairs. |
| Longevity: | Extends the life of the fridge. |
Addressing issues quickly ensures your refrigerator runs smoothly. It helps in maintaining the appliance’s performance and reliability.
Locating The Control Board
Understanding how to locate the control board in your GE refrigerator can save you time and money. The control board manages essential functions like temperature and defrost cycles. Knowing its location is the first step in troubleshooting.
Preparation Steps
Before you start, ensure you have the necessary tools and safety measures in place. Here are the key steps:
- Unplug the Refrigerator: Always disconnect the power.
- Gather Tools: You’ll need a screwdriver and a flashlight.
- Clear Space: Move items away from the back of the fridge.
Accessing The Control Board
To access the control board, follow these steps:
- Locate the Panel: The control board is usually behind a panel on the back of the fridge.
- Remove Screws: Use a screwdriver to remove the screws securing the panel.
- Open the Panel: Carefully remove the panel to expose the control board.
Now you can see the control board and start troubleshooting. Make sure to handle it carefully to avoid damage.
Common Control Board Problems
The control board in a GE refrigerator is like its brain. It manages many functions, ensuring your food stays fresh. Sometimes, issues arise with the control board. Identifying these problems early can save you time and money. Let’s explore some common control board problems.
Power Irregularities
Power issues can cause the control board to malfunction. Here are some signs of power irregularities:
- Intermittent Power Loss: The refrigerator turns off and on randomly.
- Display Panel Issues: The panel flickers or shows errors.
- Unusual Noises: Strange sounds from the fridge indicate power problems.
Ensure the fridge is plugged into a grounded outlet. Check for any visible damage to the power cord. Using a surge protector can prevent power surges. If the problem persists, consider replacing the control board.
Faulty Temperature Readings
The control board regulates the temperature. Incorrect readings can spoil your food. Look out for these signs:
- Inconsistent Cooling: Food items are not at the desired temperature.
- Freezer Burn: Ice build-up or frost in the freezer.
- Warm Fridge: The fridge compartment feels warmer than it should.
Check the temperature settings on the control panel. Ensure the fridge is not overloaded, blocking air vents. Clean the condenser coils to improve efficiency. If the issue continues, the control board may need a replacement.
| Problem | Possible Cause | Solution |
|---|---|---|
| Intermittent Power Loss | Power cord damage | Inspect and replace the cord |
| Display Panel Issues | Surge problems | Use a surge protector |
| Inconsistent Cooling | Blocked air vents | Rearrange items and clear vents |
Initial Quick Fix Strategies
Is your GE refrigerator acting up? Sometimes, simple fixes can solve the issue. Try these initial quick fix strategies to troubleshoot your GE refrigerator control board. These steps can save you time and money.
Power Cycle The Refrigerator
One of the easiest fixes is to power cycle the refrigerator. This can reset the control board and fix many issues.
- Unplug the refrigerator from the power outlet.
- Wait for 10 minutes.
- Plug the refrigerator back in.
- Check if the issue is resolved.
Power cycling helps clear temporary glitches in the system. If this doesn’t work, try the next step.
Resetting The Control Board
Resetting the control board can also fix many problems. Follow these steps to reset the control board:
- Locate the control board panel. It’s usually behind the refrigerator.
- Press the reset button on the control board.
- Hold the button for 5 seconds.
- Release the button and wait for the refrigerator to restart.
Resetting the control board can fix issues like erratic cooling or unresponsive displays. If the problem persists, you may need professional help.
Diagnostic Mode Activation
Activating the diagnostic mode on a GE refrigerator can help identify issues. This mode provides valuable information through diagnostic codes. These codes can pinpoint problems with various components of the refrigerator.
Entering Diagnostic Mode
To enter the diagnostic mode, follow these steps:
- Locate the control panel on your GE refrigerator.
- Press and hold the “Energy Saver” and “Lighting” buttons simultaneously.
- Hold the buttons for approximately 8-10 seconds.
- The display will show “0” and then “d”, indicating diagnostic mode.
Ensure the refrigerator doors are closed during this process. The display will now show diagnostic codes.
Interpreting Diagnostic Codes
Once in diagnostic mode, the refrigerator will display codes. These codes help identify specific issues. Here is a table of common diagnostic codes and their meanings:
| Code | Meaning |
|---|---|
| dE | Defrost System Error |
| FF | Freezer Fan Error |
| rF | Refrigerator Fan Error |
| tC | Thermistor Error |
| C | Compressor Error |
Each code corresponds to a specific problem. Use the codes to identify and resolve issues.
For instance, a dE code suggests a problem with the defrost system. A FF code indicates an issue with the freezer fan.
Addressing these issues promptly can prevent further damage. Regular troubleshooting can keep your refrigerator running efficiently.
Replacing Faulty Components
Replacing faulty components in your GE refrigerator control board can restore its functionality. Identifying and replacing defective parts can save you time and money. Follow these steps to troubleshoot and replace faulty components efficiently.
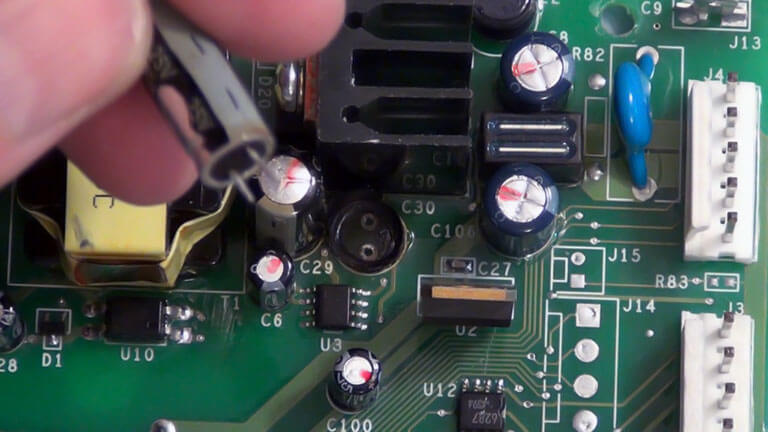
Identifying Defective Parts
Before replacing components, identify which parts are defective. Use a multimeter to check voltage and continuity. Common faulty parts include capacitors, resistors, and relays. Look for burnt or damaged areas on the board. Use this table to help identify common issues:
| Component | Symptoms |
|---|---|
| Capacitors | Bulging or leaking |
| Resistors | No continuity |
| Relays | Stuck in open or closed position |
Step-by-step Replacement Process
Replacing faulty components requires precision and care. Follow these steps:
- Unplug the refrigerator to ensure safety.
- Locate the control board, usually at the back or bottom.
- Remove the protective cover using a screwdriver.
- Identify the faulty component using a multimeter.
- Desolder the defective part using a soldering iron.
- Replace with a new, identical component.
- Solder the new part securely in place.
- Reassemble the control board and cover.
- Plug the refrigerator back in and test.
Ensuring all connections are secure is crucial. Double-check your work before powering the appliance.
Testing After Ge Refrigerator Control Board Troubleshooting
After fixing your GE refrigerator control board, testing is crucial. This ensures the repair was successful. Follow these steps to verify functionality and monitor performance.
Verifying Functionality
Start by reconnecting the refrigerator to the power source. Check if the display lights up correctly. Listen for the sound of the compressor starting.
- Ensure the display panel responds to button presses.
- Verify the interior lights turn on when the door opens.
- Check the temperature settings on the control panel.
If everything seems normal, proceed to test the cooling function. Place a thermometer inside the fridge and freezer compartments. Leave it for a few hours to get accurate readings.
Compare the thermometer readings with the set temperature. Make sure they match or are very close. If there are discrepancies, you may need further adjustments.
Monitoring Performance Post-fix
After verifying basic functionality, monitor the refrigerator over the next few days. Keep an eye on the cooling performance and overall operation.
- Check the temperature periodically.
- Listen for any unusual noises.
- Inspect for any signs of frost buildup.
If your refrigerator maintains consistent temperatures, the repair was successful. If any issues arise, recheck your troubleshooting steps. This helps ensure long-term performance and reliability.
A properly functioning GE refrigerator control board ensures your food stays fresh. It also helps in energy efficiency.
When To Seek Professional Help
Dealing with a malfunctioning GE refrigerator control board can be challenging. Understanding when to seek professional help is crucial for resolving issues efficiently. This section will guide you on complex issues and warranty considerations when dealing with your GE refrigerator.
Complex Issues Requiring Expertise
Some problems need a professional’s touch. Here are a few:
- Electrical problems can be dangerous.
- Software glitches often need specialized tools.
- Component failures might require expert diagnosis.
Attempting these repairs yourself could worsen the issue. It’s best to call a professional.
Warranty Considerations
Before attempting any repairs, check if your refrigerator is under warranty. Here are some points to consider:
| Aspect | Details |
|---|---|
| Warranty Validity | Ensure the warranty is still active. |
| Covered Repairs | Check what repairs are covered. |
| Authorized Technicians | Use only authorized service centers. |
Doing repairs yourself might void the warranty. Always consult the warranty terms first.
Preventive Measures For Future
To avoid common issues with your GE refrigerator control board, take preventive steps. Regular maintenance and upgrading outdated components can help. These measures ensure your refrigerator runs smoothly for years.
Regular Maintenance Tips
Regular maintenance is essential for the longevity of your refrigerator. Follow these tips to keep your control board in good shape:
- Clean the Coils: Dust and debris can accumulate on the coils. Clean them every six months.
- Check the Temperature Settings: Ensure your refrigerator and freezer are set to the proper temperatures.
- Inspect the Door Seals: Worn-out seals can cause the refrigerator to work harder. Check them regularly.
- Monitor the Control Board: Look for any error codes or unusual behavior.
- Keep the Refrigerator Level: Ensure your refrigerator is level to avoid putting stress on the control board.
Upgrading Outdated Components
Sometimes, older components need replacement to ensure the refrigerator runs efficiently. Consider the following upgrades:
- Install a New Control Board: Newer models are more efficient and reliable.
- Replace the Thermostat: An old thermostat can cause temperature issues.
- Upgrade to Modern Sensors: New sensors provide more accurate readings.
- Switch to Energy-Efficient Compressors: These save energy and reduce wear on the control board.
By following these preventive measures, you can ensure your GE refrigerator control board stays in top condition.
Frequently Asked Questions
What Does A Ge Refrigerator Control Board Do?
The control board manages the refrigerator’s functions like temperature and defrost cycles.
How To Reset Ge Refrigerator Control Board?
Unplug the refrigerator for 5 minutes, then plug it back in.
Why Is My Ge Refrigerator Not Cooling?
A faulty control board could be the reason for cooling issues.
Can I Replace The Control Board Myself?
Yes, but ensure you follow the manufacturer’s instructions carefully.
How To Identify A Bad Control Board?
Common signs include inconsistent temperatures and unresponsive controls.
Conclusion
Troubleshooting your GE refrigerator control board can save you time and money. By following the steps outlined, you can identify and fix common issues. Always remember to prioritize safety and consult a professional if needed. Proper maintenance ensures your fridge runs smoothly and efficiently for years to come.