
Check for power issues and ensure all connections are secure. Inspect for error codes and follow the manual.
The LCI Leveling System is essential for RV stability and comfort. Troubleshooting can save time and prevent costly repairs. Common issues include power problems, loose connections, and error codes. It’s crucial to regularly inspect the system and perform routine maintenance.
Always refer to the user manual for specific error codes and solutions. Keeping the system clean and free of debris can also prevent malfunctions. Properly maintained, the LCI Leveling System ensures a hassle-free RV experience, providing peace of mind and safety on the road. Regular checks and prompt troubleshooting keep the system running smoothly.
Introduction To Lci Leveling Systems
LCI Leveling Systems are essential for maintaining a level RV. They ensure your RV is stable and safe. A level RV improves comfort and functionality. It also protects your RV from damage.
The Importance Of A Level Rv
A level RV is more comfortable. You can sleep and cook better. Appliances like fridges work best on a level surface. It also prevents wear and tear. Your RV lasts longer when it is level.
Basic Components Of Lci Systems
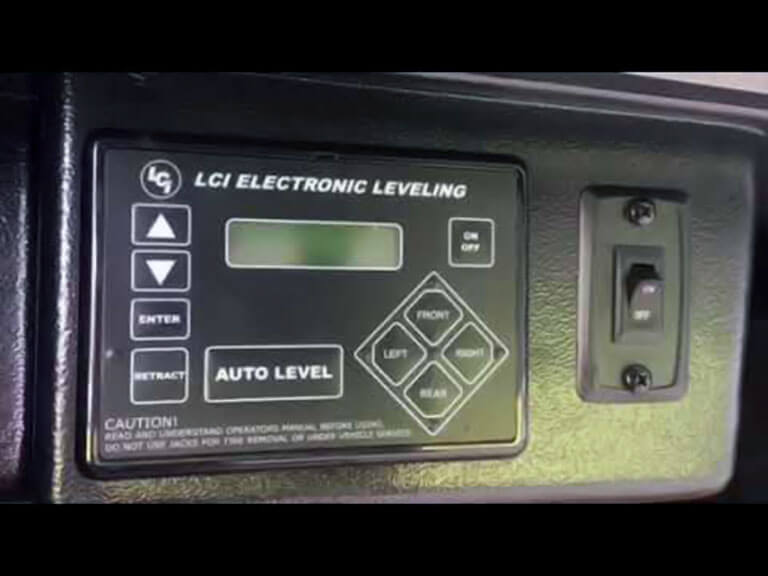
LCI Systems have several key components:
- Control Panel: This is where you operate the system.
- Hydraulic Pump: Moves hydraulic fluid to level the RV.
- Leveling Jacks: Extend and retract to level the RV.
- Sensors: Detect the RV’s level and provide feedback.
Each part has a crucial role. The Control Panel lets you control the system. The Hydraulic Pump powers the jacks. The Leveling Jacks do the heavy lifting. The Sensors ensure everything is level.
Common Issues With Lci Leveling Systems
LCI Leveling Systems make RV leveling easy. But, sometimes, issues arise. Knowing common problems can help you fix them quickly.
Unresponsive Controls
One common issue is unresponsive controls. This can happen due to:
- Dead batteries in the control panel
- Loose connections in wiring
- Damaged fuses that need replacing
Check these parts first. Often, replacing a fuse or battery solves the problem.
Uneven Leveling
Uneven leveling is another issue. It may occur due to:
- Low hydraulic fluid levels
- Air in the hydraulic lines
- Damaged sensors
Keep hydraulic fluid at the proper level. Bleed air from lines. Check sensors for damage. This helps the system level correctly.
System Error Codes
System error codes can be confusing. Here are some common codes:
| Error Code | Description | Solution |
|---|---|---|
| ER1 | Low voltage | Check and charge battery |
| ER2 | Motor overload | Allow motor to cool |
| ER3 | Communication error | Check wiring connections |
Refer to your manual for other codes. Knowing these helps you troubleshoot faster.
Pre-troubleshooting Steps
Before diving into troubleshooting your LCI Leveling System, it’s crucial to take some preliminary steps. These steps will ensure your safety and help you diagnose the problem more effectively. Follow these guidelines to prepare for troubleshooting your LCI Leveling System.
Safety First: Disconnecting Power
Safety is always the top priority. Disconnecting the power is the first step. This will prevent any electrical hazards. Follow these steps to safely disconnect the power:
- Turn off the main power switch.
- Unplug the power cord from the outlet.
- Remove the battery if it’s easily accessible.
After ensuring the power is disconnected, you can proceed safely.
Consulting The User Manual
The user manual is your best friend in troubleshooting. It contains specific instructions and diagrams. Follow these steps to make the most out of your user manual:
- Locate the user manual for your LCI Leveling System.
- Read through the troubleshooting section.
- Identify any error codes or specific issues mentioned.
Having the user manual on hand will make troubleshooting more effective and less time-consuming.
Resetting The Lci Leveling System
The LCI Leveling System is essential for RV stability. Sometimes, you may need to reset it. Here’s a guide on when and how to reset the system.
When To Perform A Reset
Knowing when to reset your LCI Leveling System is crucial. Here are some scenarios:
- The system fails to level the RV correctly.
- Error codes appear on the control panel.
- The system does not respond to commands.
- The leveling process is unusually slow.
Step-by-step Reset Process
Follow these steps to reset your LCI Leveling System:
- Ensure the RV is on a flat surface.
- Turn off the engine and engage the parking brake.
- Locate the control panel inside the RV.
- Press and hold the “Up” and “Down” buttons simultaneously.
- Wait for the system to beep and the screen to reset.
- Release the buttons after the reset completes.
- Test the system by initiating a manual leveling sequence.
Resetting the LCI Leveling System can solve many issues. Follow these simple steps to ensure your RV remains stable and level.
Calibrating The Lci Leveling System
Calibration of the LCI Leveling System ensures your RV stays level. It is crucial for comfort and stability. Proper calibration prevents uneven wear and tear. This guide helps you understand when and how to calibrate your LCI Leveling System.
Signs Calibration Is Needed
Here are some signs you might need to calibrate your system:
- The RV tilts even when the system shows it is level.
- The jacks do not extend or retract properly.
- You notice uneven tire wear.
- The control panel shows error codes.
Calibration Procedure
Follow these steps to calibrate your LCI Leveling System:
- Ensure the RV is on a flat and level surface.
- Turn on the ignition but do not start the engine.
- Press the auto level button on the control panel.
- Wait for the system to complete the leveling process.
- Check all four corners of the RV to ensure it is level.
- If not level, adjust manually using the manual mode.
- Press the calibrate button to save the new settings.
Regular calibration ensures your RV stays level and stable. It also extends the life of your leveling system.
Addressing Hydraulic Issues
Hydraulic issues can disrupt the performance of the LCI Leveling System. Addressing these issues ensures your system operates smoothly. This section covers leak detection, repairs, and hydraulic fluid maintenance.
Leak Detection And Repair
Detecting leaks early prevents damage to the hydraulic system. Check for visible signs of leaks such as puddles or wet spots. Inspect hoses, fittings, and cylinders. If you find a leak, repair it immediately.
- Inspect hoses for cracks.
- Check fittings for looseness.
- Look for wet spots on cylinders.
Tighten any loose fittings. Replace damaged hoses or cylinders. Use a clean cloth to wipe away any hydraulic fluid. This helps you see if the leak persists. Always use the correct tools when making repairs.
Hydraulic Fluid Maintenance
Maintaining hydraulic fluid is crucial for the system’s performance. Check the fluid level regularly. Low fluid levels can cause the system to malfunction. Always use the recommended type of hydraulic fluid.
- Check fluid levels weekly.
- Use a clean dipstick to measure fluid.
- Top up with recommended hydraulic fluid.
Dirty fluid can damage the system. Replace hydraulic fluid every 12 months or as recommended. Use a clean container to avoid contamination. Proper fluid maintenance extends the life of your LCI Leveling System.
Electrical Lci Leveling System Troubleshooting
Troubleshooting the electrical components of the Lci Leveling System requires a systematic approach. Electrical issues can cause the system to malfunction, making your RV or trailer unlevel. This section will guide you through essential checks and inspections to ensure your system operates smoothly.
Battery And Voltage Checks
One of the first steps in electrical troubleshooting is to check the battery and voltage levels. Low battery voltage can cause the leveling system to function improperly.
- Ensure the battery is fully charged.
- Check the voltage using a multimeter. The voltage should be between 12.6V and 13.2V.
- Inspect the battery terminals for corrosion and clean them if necessary.
If the voltage is low, charge the battery or replace it. A healthy battery ensures the proper operation of the leveling system.
Inspecting Wiring And Connections
Faulty wiring or loose connections can disrupt the electrical flow, causing the system to fail. Inspect all wiring and connections thoroughly.
- Check for any visible damage or wear on the wires.
- Ensure all connections are tight and secure.
- Look for any signs of fraying or exposed wires.
Use a multimeter to check the continuity of the wires. This ensures there are no breaks or shorts in the circuit.
| Issue | Possible Cause | Solution |
|---|---|---|
| System not powering on | Loose connection | Tighten all connections |
| Intermittent operation | Frayed wire | Replace the damaged wire |
| Low voltage readings | Battery issue | Charge or replace the battery |
Regularly inspecting and maintaining your wiring and connections can prevent many electrical issues in your Lci Leveling System.
Manual Override: When All Else Fails
Manual Override: When All Else Fails can save your trip. Sometimes, automated systems fail. The LCI Leveling System is no exception. Knowing how to use the manual override is crucial.
Understanding Manual Override
The manual override lets you control the system manually. This feature is a lifesaver in emergencies. It ensures you can level your RV even if the system fails.
Manual override involves using specific tools. These tools help you bypass the automated system. Understanding where these tools are stored is essential.
How To Manually Adjust The System
Follow these steps to manually adjust the LCI Leveling System:
- Locate the manual override tools in your RV.
- Find the hydraulic pump under your vehicle.
- Insert the manual override tool into the designated slot.
- Turn the tool to manually extend or retract the jacks.
Ensure you adjust each jack evenly. This prevents your RV from tilting.
If your RV has an electric system, locate the manual override switch. Flip the switch to the manual mode. Use the hand crank to adjust the jacks manually.
Regular maintenance of the manual override system is important. Check the tools and switches for any damage. Keep them in good working condition.
| Step | Description |
|---|---|
| 1 | Locate manual override tools |
| 2 | Find hydraulic pump |
| 3 | Insert manual override tool |
| 4 | Turn tool to extend/retract jacks |
- Check tools regularly
- Ensure switches are functional
- Practice using the manual override
Mastering the manual override ensures smooth trips. Be prepared for any situation.
When To Seek Professional Help
Troubleshooting the LCI Leveling System can sometimes be straightforward. Yet, there are times when the issues become too complex. Understanding when to seek professional help can save you time and frustration. This section will guide you on recognizing complex issues and finding qualified service providers.
Recognizing Complex Issues
Some problems are beyond basic troubleshooting steps. Here are signs that you need professional help:
- Unresponsive System: The system does not respond to commands.
- Error Codes: Persistent error codes that you can’t clear.
- Hydraulic Issues: Leaks or unusual sounds from the hydraulic system.
- Electrical Problems: Blown fuses or burnt wires.
- Mechanical Failures: Parts that appear broken or misaligned.
Finding Qualified Service Providers
When you need professional help, it’s crucial to find qualified service providers. Use these steps to ensure you select the best:
- Research: Look for technicians with specific experience in LCI systems.
- Credentials: Verify their certifications and training.
- Reviews: Check online reviews and testimonials.
- Quotes: Get multiple quotes to compare prices and services.
- Warranties: Ensure they offer warranties on their work.
Use these tips to identify the right professional for your LCI Leveling System troubles. Recognizing complex issues early and finding the right help can save you from bigger problems.
Preventive Measures And Best Practices
Taking care of your Lci Leveling System ensures its longevity and reliability. By following preventive measures and adopting best practices, you can avoid common issues. Here are some steps to keep your system running smoothly.
Regular Maintenance Tips
- Inspect the system for any visible wear or damage monthly.
- Lubricate the moving parts with manufacturer-recommended lubricants.
- Check for any loose connections and tighten them as needed.
- Ensure the system is clean from dirt and debris.
- Test the leveling system’s functionality before every trip.
Upgrade Options For Reliability
Upgrading your Lci Leveling System can improve its performance. Consider these options for better reliability:
- Install a more powerful motor for smoother operations.
- Upgrade to advanced sensors for accurate leveling.
- Use high-quality wiring to prevent electrical issues.
- Consider a backup battery system for emergencies.
By following these preventive measures and best practices, your Lci Leveling System will remain reliable. Regular maintenance and thoughtful upgrades can save you from future troubles.
Frequently Asked Questions
How Do I Reset My Lci Leveling System?
To reset, turn off the system, then press and hold the “Front” button until you hear a beep.
Why Is My Lci Leveling System Beeping?
The system beeps due to low voltage, uneven leveling, or a system error. Check connections and battery voltage.
What Causes Lci Leveling System Failure?
Common causes include low battery, poor ground connection, sensor issues, or hydraulic fluid problems. Inspect these areas first.
How Can I Fix Lci Error Codes?
Error codes often indicate specific issues. Refer to the user manual for troubleshooting steps and code explanations.
Why Won’t My Lci Jacks Retract?
Jacks may not retract due to low hydraulic fluid, electrical issues, or mechanical obstructions. Check fluid levels and connections.
Conclusion
Maintaining your LCI leveling system ensures smooth travels and fewer hassles. Troubleshooting common issues can save time and money. Always refer to the manual for precise guidance. Regular checks can prevent major problems. Stay proactive, and your RV adventures will remain enjoyable and worry-free.
Safe travels!