
If you have a Motorola baby monitor, you know how essential it is for keeping an eye on your little one. But what happens when the charging port fails? Suddenly, your monitor won’t charge, and you’re left worrying about your baby’s safety. Many parents face this problem, but the good news is: you don’t have to throw away your monitor or buy a new one immediately. You can often replace the charging port and get your device working again. This guide will show you, step by step, how to handle Motorola baby monitor charging port replacement—what tools you need, how to do it safely, and what to watch out for. If you’re not a tech expert, don’t worry. With some patience and care, you can restore your monitor and save money.
Understanding The Problem: Motorola Baby Monitor Charging Port Failure
Baby monitors are used daily, sometimes for hours at a time. Over time, the charging port can become loose, bent, or completely stop working. This usually happens because the port gets tugged, the cable is inserted roughly, or dust and dirt build up inside. Some common signs your charging port is failing:
- Monitor does not charge when plugged in.
- Wiggling the cable makes charging start and stop.
- The charging light blinks or never turns on.
- The port feels loose or wobbly.
If you notice these symptoms, it’s likely a charging port issue. Quick action can prevent more damage.
Is Replacing The Charging Port Worth It?
Many people wonder if replacing the port is worth the effort. Let’s break down the main reasons people choose to fix their Motorola baby monitor charging port:
- Cost savings: Buying a new monitor can cost $50–$200. Replacing a port usually costs $5–$30 if you do it yourself.
- Environmental impact: Repairing means less electronic waste.
- Sentimental value: Some parents trust their current monitor and do not want to learn a new device.
However, if your monitor is very old, has other problems, or you’re not comfortable with small repairs, it may be time for a replacement. But for most people, a charging port replacement is a smart and practical choice.
Tools And Parts Needed For Charging Port Replacement
Before you begin, gather everything you need. Using the right tools makes the process easier and safer.
Essential Tools
- Small Phillips screwdriver (size #0 or #00)
- Plastic prying tool or guitar pick
- Tweezers
- Soldering iron (15–30W, fine tip)
- Solder (lead-free, 0.5mm)
- Desoldering pump or solder wick
- Magnifying glass (optional but helpful)
- Anti-static wrist strap (for safety)
Replacement Parts
- Correct charging port (usually Micro USB or USB-C, depending on your monitor model)
- Replacement battery (optional, if your battery is also failing)
Supplies
- Isopropyl alcohol (for cleaning)
- Cotton swabs
- Small container (for screws)
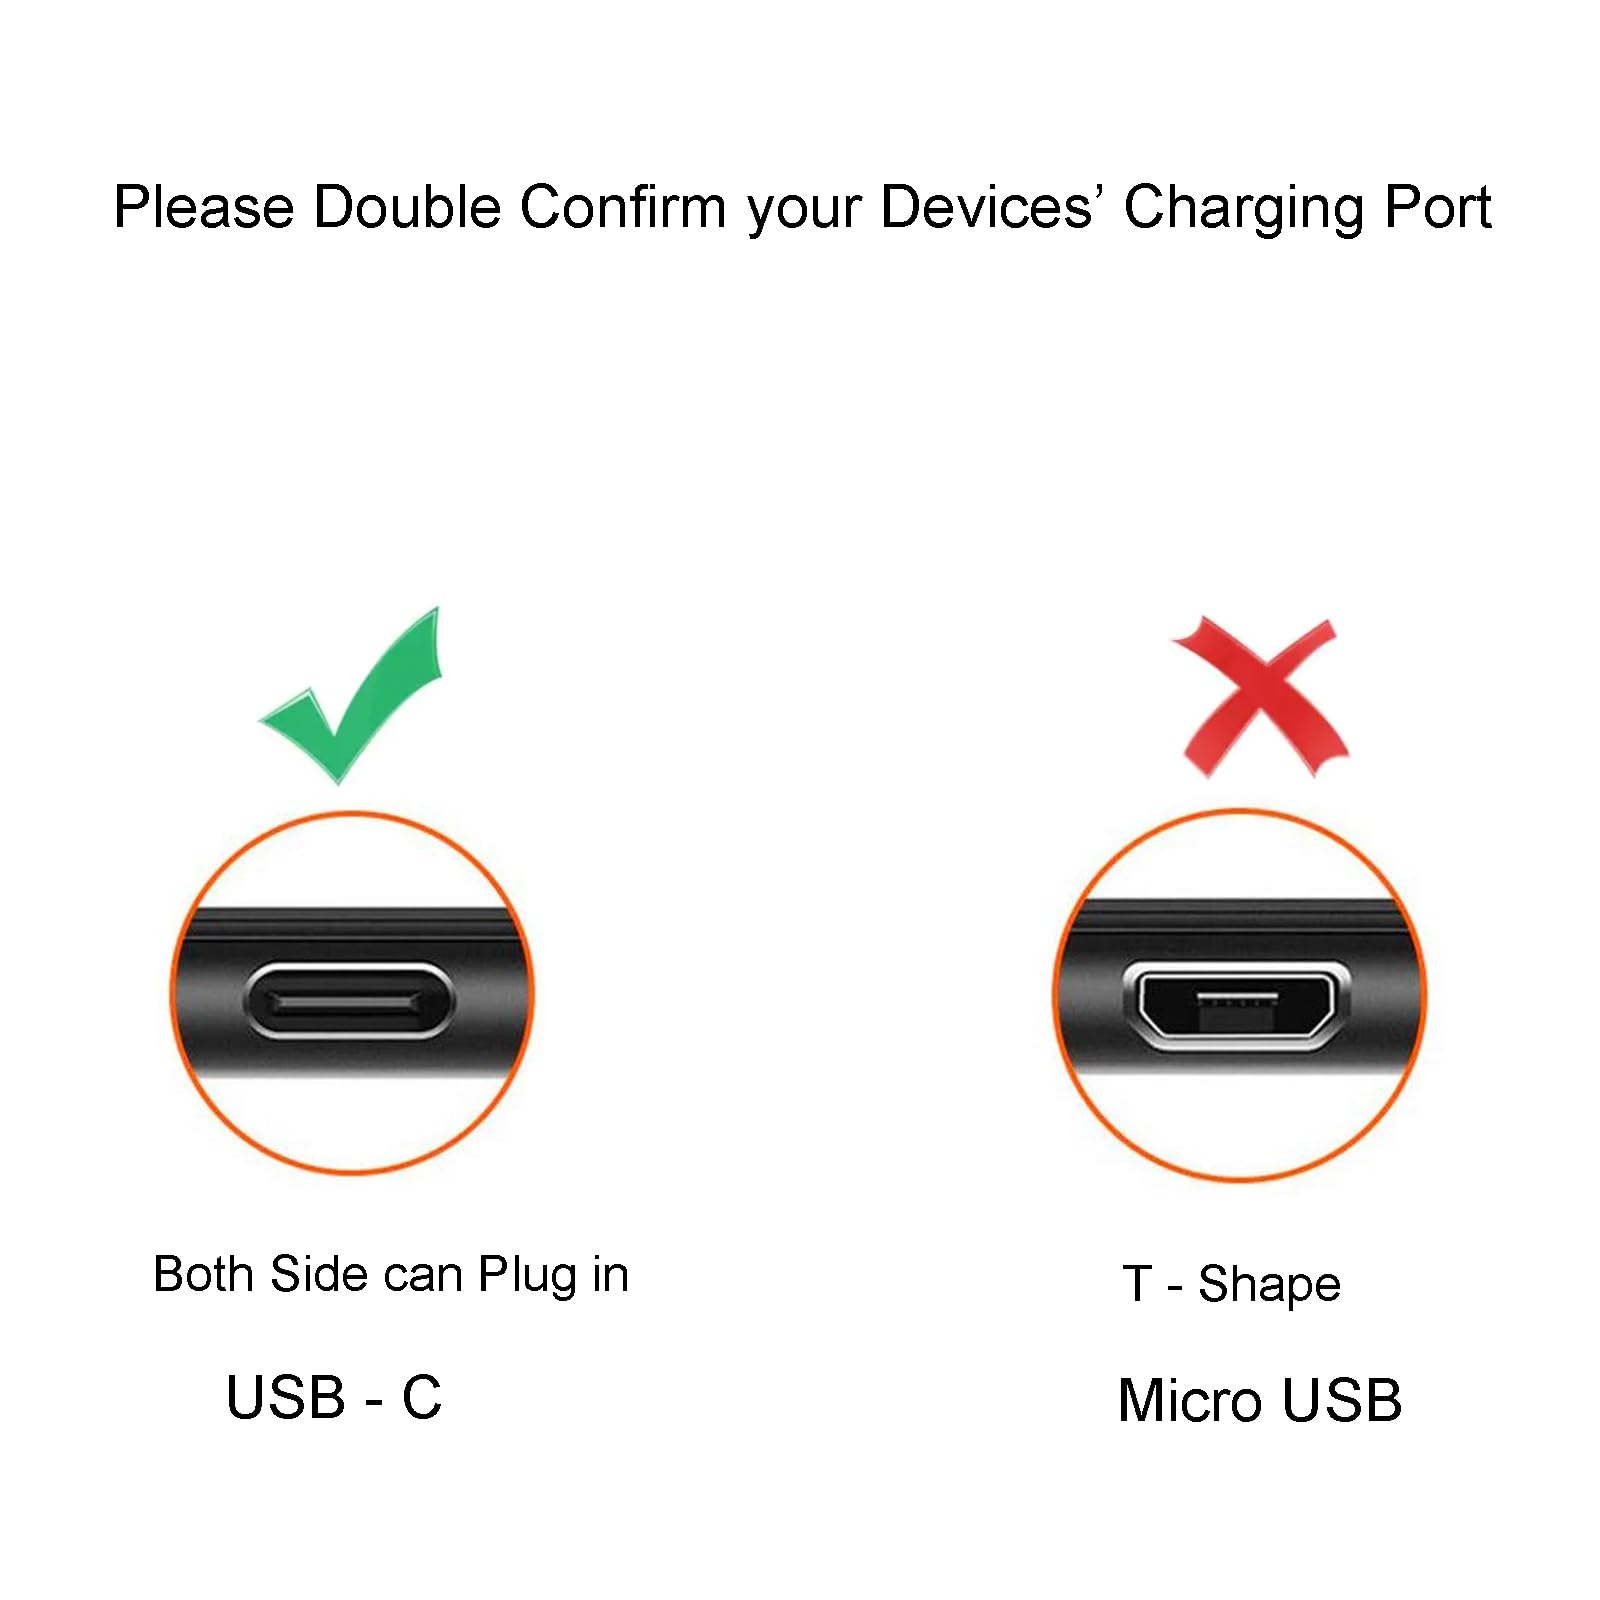
Choosing The Right Charging Port
Not all Motorola baby monitors use the same charging port. Most common are Micro USB (for older models) and USB-C (for newer models). Some rare models use barrel-style jacks.
Check your monitor’s user manual or search your model number to find the correct port type. If unsure, compare the port’s look to images online or take the old port to an electronics store. Getting the wrong port is a common beginner mistake.
Step-by-step Guide: Replacing A Motorola Baby Monitor Charging Port
Working on a baby monitor can feel intimidating, but with patience, you can do it safely. Here’s how:
Step 1: Prepare Your Workspace
Find a clean, well-lit table. Lay down a soft cloth to prevent scratches. Keep all tools and parts within reach. If you have pets or children, make sure they can’t access small parts.
Step 2: Power Off And Remove The Battery
Unplug the monitor and turn it off. If your monitor has a removable battery, take it out. This prevents electric shock and protects the device.
Step 3: Open The Monitor Case
Use your small Phillips screwdriver to remove all screws on the back. Place screws in a small container. Gently pry open the case using a plastic tool or guitar pick. Do not force it—look for hidden screws under stickers or rubber feet.
Step 4: Locate The Charging Port
Once open, find the charging port. It’s usually soldered onto the main circuit board and may have small pins attached to metal pads.
Step 5: Remove The Damaged Charging Port
Here’s where things get delicate. Plug in your anti-static wrist strap if you have one. Heat your soldering iron and carefully melt the solder on each pin of the charging port. Use a desoldering pump or solder wick to remove old solder. Gently lift the port off the board with tweezers once all pins are free.
Pro tip: Be patient—don’t pry or force the port off, or you may damage the board.
Step 6: Clean The Area
Use a cotton swab with a bit of isopropyl alcohol to clean the solder pads. Make sure there’s no debris or leftover solder.
Step 7: Install The New Charging Port
Align the new port’s pins with the pads on the board. Hold it steady with tweezers. Touch each pin with the heated soldering iron and add a small amount of fresh solder. Do not use too much solder—a small bead is enough.
Let the solder cool for a few minutes. Check that the port is straight and firmly attached.
Step 8: Reassemble The Monitor
Replace the battery if you removed it. Snap the monitor case back together and replace all screws. Double-check that nothing is left inside.
Step 9: Test Your Repair
Plug in the charger and watch for the charging light. If it doesn’t work, open the case again and check your solder joints. Sometimes, one pin may not be making good contact.
Step 10: Final Cleaning And Safety Check
Wipe down the case and screen with a soft cloth. Make sure all screws are tight and there are no leftover parts.

Common Mistakes And How To Avoid Them
Many first-time repairers face problems. Here are mistakes to avoid:
- Using too much force: Forcing the case or port can break the circuit board.
- Soldering for too long: Holding the iron on a pin for more than a few seconds can damage pads.
- Mixing up screws: Keep track of screw types and locations.
- Wrong port type: Double-check your replacement part before starting.
If you’re unsure at any step, consider asking a friend with electronics experience, or take the monitor to a repair shop.
Cost Comparison: Diy Vs Professional Repair Vs Replacement
To help you decide if DIY repair is right for you, here’s a cost and time comparison:
| Option | Average Cost | Time Needed | Skill Level |
|---|---|---|---|
| DIY Charging Port Replacement | $5–$30 (tools + parts) | 1–2 hours | Intermediate |
| Professional Repair Shop | $40–$80 | 2–7 days (includes waiting time) | None |
| Buy New Monitor | $50–$200 | Immediate (if in stock) | None |
DIY is cheapest, but not everyone has the right tools. Professional repair is a safe middle option if you’re not confident.
Safety Tips For Handling Electronics
Working with electronics can be safe if you follow these rules:
- Unplug and power off before starting.
- Use an anti-static wrist strap to prevent damaging the circuit board.
- Keep small parts away from children and pets.
- Work in a ventilated area when soldering.
- Wear safety glasses to protect your eyes.
Never work on electronics if you’re tired or distracted. Double-check all connections before plugging the monitor back in.
When To Call A Professional
Some repairs are best left to experts. If you notice:
- Burned or melted parts on the circuit board
- Cracked screen or other major damage
- Battery swelling
…stop and get help from a professional. Trying to fix these problems yourself can be dangerous or make the damage worse.
How To Find The Correct Replacement Part
Finding the exact charging port is important. Here’s how to get it right:
- Check your model number—look on the back sticker or inside the battery compartment.
- Search for your model online—type “[Model Number] charging port replacement” into Google.
- Compare images—Make sure the port’s shape and pin arrangement match.
- Buy from reputable sellers—Avoid unknown brands or used parts.
If possible, buy two ports. Sometimes, a beginner will damage the first one and need a spare.
How To Test Your Repair Before Full Reassembly
After soldering the new port, but before closing the case fully, plug in the charger and battery. Watch for the charging light or battery icon on the monitor. If it works, finish reassembly. If not, check for:
- Loose pins
- Solder bridges (accidental connections between pins)
- Wrong port orientation
A magnifying glass can help you spot small errors.
How To Maintain Your Baby Monitor’s Charging Port
Once your monitor is working again, protect your new charging port:
- Use gentle pressure when plugging in the cable.
- Avoid pulling the cable sideways or yanking it out.
- Keep the port clean—dust can cause problems.
- Use high-quality cables—cheap cables can damage the port.
Every few months, check the port for dirt or looseness. Clean it with a dry brush or compressed air if needed.
Real-world Example: Replacing A Motorola Mbp36 Charging Port
Let’s look at a specific example. The Motorola MBP36 is a popular baby monitor with a Micro USB charging port.
A parent notices their monitor will only charge if the cable is held at an angle. They decide to replace the port. Here’s what they do:
- Buy a Micro USB port online for $7.
- Gather tools: Screwdriver, soldering iron, desoldering pump.
- Open the monitor, remove the battery, and locate the port.
- Desolder the old port, clean the pads, and install the new one.
- Test before closing—charging light turns on.
- Reassemble and use the monitor as normal.
The total repair takes about 90 minutes, and the monitor works like new. The parent saves over $60 compared to buying a new device.

Comparing Common Motorola Models And Their Charging Ports
Different Motorola baby monitors use different charging ports. Here’s a quick comparison of popular models:
| Model | Charging Port Type | Repair Difficulty |
|---|---|---|
| MBP33 | Micro USB | Medium |
| MBP36 | Micro USB | Medium |
| MBP855 | USB-C | High |
| MBP482 | Barrel Jack | Low |
| MBP50-G2 | Micro USB | Medium |
USB-C ports are smaller and require more precise soldering. Barrel jacks are easier to replace but less common.
Environmental Impact Of Repair Vs Replacement
Repairing your baby monitor’s charging port reduces e-waste. Millions of devices are thrown away each year, and small repairs help the planet. One study showed that up to 80% of the energy used by electronics comes from their manufacture—not their use. Fixing instead of replacing is a simple but powerful way to help the environment.
How To Find A Good Repair Shop
If DIY isn’t for you, a local electronics repair shop can help. Here’s what to look for:
- Experience with small electronics—Ask if they’ve repaired baby monitors before.
- Warranty on repairs—A good shop will guarantee their work for 30–90 days.
- Clear pricing—Get a written estimate before you agree.
Online reviews can also help you find a trustworthy shop. If you live in a remote area, some shops let you mail your device in for repair.
How To Tell If Your Charger Is The Problem (not The Port)
Sometimes, the charger fails, not the port. Before replacing the port, try these checks:
- Use a different charger and cable. If the monitor charges, your port is fine.
- Check the charger on another device. If it doesn’t work there, replace the charger.
- Wiggle the cable gently in the port. If the connection is stable, the port is likely okay.
Don’t rush to repair the port if a simple cable swap solves the problem.
How To Back Up Important Data Before Repair
Some Motorola monitors store videos or settings internally. Before opening the device:
- Save any video clips to a computer or cloud.
- Write down WiFi passwords and monitor settings.
- Take photos of the device’s setup screens.
After repair, you may need to reset or re-enter settings.
What To Do If Your Repair Fails
Not every repair works the first time. If your monitor still doesn’t charge:
- Check all solder joints for cold connections or missed pins.
- Look for solder bridges that may short the board.
- Try a different replacement port if the first is faulty.
- Seek professional help—sometimes, the fault is deeper in the circuit.
Don’t keep trying if you see smoke or smell burning. Unplug and get help.
Repair Vs Replacement: Long-term Considerations
While repairing your charging port saves money now, think about the long run:
- If your monitor is over five years old, other parts (like the battery or screen) may soon fail.
- Newer models often have better battery life, range, and features.
- If you need a monitor urgently, buying new may be faster.
But for most parents, a successful port repair adds years of life to their trusted device.
Latest Trends: Usb-c And Wireless Charging In Baby Monitors
Many new baby monitors now use USB-C ports or even wireless charging. USB-C is more durable and supports fast charging. Wireless charging is rare but growing, reducing wear on ports.
If you’re buying a new monitor, look for these features for longer life and easier charging.
Step-by-step Visual Guide (why It Helps)
Some people learn better with images. If you’re unsure about the steps, search for a video of your monitor model on YouTube. Many repair channels show close-ups of the process. Visual guides can help you avoid mistakes and see exactly where screws or clips are hidden.
Motorola Baby Monitor Charging Port Replacement: Key Takeaways
- Most parents can replace a Motorola baby monitor charging port at home with patience and the right tools.
- Double-check your monitor model and port type before ordering parts.
- Take your time, work safely, and test your repair before full reassembly.
- If in doubt, seek professional help to avoid damaging your device.
- Repairing instead of replacing saves money and helps the environment.
For more on electronics repair, see this helpful guide from iFixit.
Frequently Asked Questions
How Do I Know If My Motorola Baby Monitor Charging Port Is Broken?
If your monitor does not charge, the charging light never turns on, or you have to wiggle the cable to get it to work, the charging port may be damaged. Try a different charger first to rule out cable problems.
Can I Replace The Charging Port Without Soldering?
Most Motorola baby monitors have the charging port soldered to the main circuit board. You will need a soldering iron to remove the old port and attach the new one. If you are not comfortable soldering, a repair shop can help.
What Type Of Charging Port Does My Motorola Monitor Use?
Most models use Micro USB (older) or USB-C (newer). Some rare models use a barrel jack. Check your model number or compare the port to online images before buying a replacement.
Is It Safe To Repair A Baby Monitor At Home?
Yes, if you follow safety steps: unplug the device, remove the battery, use an anti-static strap, and work carefully. If you feel unsure, ask for help from someone with experience or use a professional repair service.
Will Replacing The Charging Port Affect My Monitor’s Warranty?
Opening your monitor and soldering will usually void the warranty. If your device is still under warranty, contact Motorola support before trying a repair.
Replacing your Motorola baby monitor charging port can give your device new life and save you money. With care and attention, you can do this repair safely at home. If you have any doubts, remember that help is available—your peace of mind, and your baby’s safety, come first.