
A malfunctioning fill valve can cause your toilet to run continuously or fail to refill properly. This issue often leads to higher water bills and annoying noise.
Toilets are essential fixtures in our homes, but they can sometimes develop issues that disrupt their functionality. One common problem is a faulty fill valve, which is responsible for refilling the toilet tank after each flush. A malfunctioning fill valve can result in continuous running water or insufficient water levels in the tank.
Identifying and fixing this issue promptly can save water and reduce utility bills. Understanding the common signs of fill valve problems and how to address them can help maintain the efficiency and reliability of your toilet system.
Common Fill Valve Problems
Experiencing issues with your toilet’s fill valve can be frustrating. Understanding the common problems can help you fix them quickly. Here’s a guide to identifying and troubleshooting these issues.
Symptoms Of A Malfunctioning Fill Valve
A malfunctioning fill valve can display several symptoms. Identifying these symptoms early can save you from bigger problems.
- Toilet runs continuously: This is a clear sign of fill valve issues.
- Weak flush: A weak flush indicates water isn’t filling the tank properly.
- Noise: Strange noises during or after flushing could point to a faulty valve.
- Water leakage: Water leaking into the bowl suggests a fill valve problem.
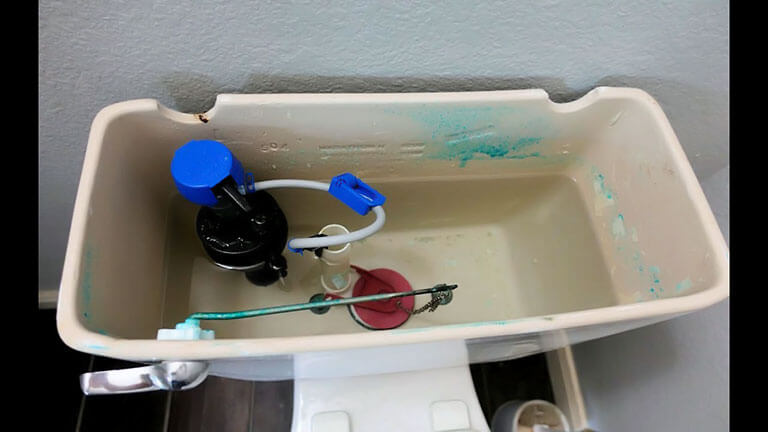
Identifying The Type Of Fill Valve
Identifying your fill valve type is essential for troubleshooting. There are different types of fill valves used in toilets.
| Type | Description |
|---|---|
| Plunger/Float Ball Valve | Older design, uses a float ball attached to an arm. |
| Diaphragm Ballcock | Uses a diaphragm instead of a plunger for operation. |
| Float Cup Fill Valve | Modern design, uses a float cup attached to a vertical rod. |
| Pressure-Assist Fill Valve | Uses water pressure to assist in flushing. Found in newer toilets. |
Understanding the type of fill valve helps in proper troubleshooting. Knowing the symptoms and the type of fill valve can make repairs easier.
Initial Assessment Steps
Toilet fill valve issues can be frustrating. With the right steps, you can fix them. Start with an initial assessment to identify the problem. This guide will help you through the process.
Safety Precautions Before Starting
Safety should be your first concern. Follow these precautions before you start:
- Turn off the water supply to the toilet.
- Disconnect the power if using an electric toilet.
- Wear rubber gloves to protect your hands.
- Keep a towel nearby to clean up any water spills.
Tools You Will Need
Having the right tools makes the job easier. Here’s a list of what you’ll need:
| Tool | Purpose |
|---|---|
| Adjustable Wrench | To loosen and tighten nuts and bolts |
| Screwdriver | To remove and install screws |
| Bucket | To catch any water from the tank |
| Plumber’s Tape | To seal pipe threads |
| Replacement Fill Valve | To replace the faulty valve |
With these tools ready, you can start your toilet troubleshooting process confidently. Following these steps ensures a smooth and effective repair.
Quick Fixes You Can Try First
Experiencing issues with your toilet fill valve can be frustrating. Before calling a plumber, try these quick fixes. They might save you time and money.
Adjusting The Float
One common problem is the float being out of adjustment. The float controls water levels in the tank. If it’s too low or too high, your toilet won’t flush properly.
- First, remove the tank lid.
- Locate the float. It’s usually a ball or cup on a rod.
- For a ball float, bend the rod to adjust the height. For a cup float, slide the float up or down the rod.
- Flush the toilet to see if the water level is correct. Adjust as needed.
Checking For Obstructions
Obstructions can block the fill valve, causing it to malfunction. Check for any debris or buildup.
- Turn off the water supply to the toilet. It’s usually a valve near the base.
- Flush the toilet to empty the tank.
- Inspect the fill valve for any debris. Clean any obstructions you find.
- Turn the water supply back on and flush the toilet. Ensure the valve works properly.
Try these easy steps to troubleshoot your toilet fill valve. They are simple and effective solutions for common issues.
Replacing A Faulty Fill Valve
Is your toilet constantly running or not filling correctly? It might be time to replace the fill valve. A faulty fill valve can cause various issues, from water wastage to a noisy toilet. Replacing it may seem daunting, but it’s a manageable task with the right guidance.
Step-by-step Guide To Valve Replacement
- Turn off the water supply: Locate the shut-off valve behind your toilet. Turn it clockwise to stop water flow.
- Empty the tank: Flush the toilet to drain the water from the tank. Use a towel to soak up any remaining water.
- Disconnect the water supply line: Use an adjustable wrench to loosen the nut connecting the water supply line to the fill valve.
- Remove the old fill valve: Unscrew the lock nut at the base of the fill valve inside the tank. Lift the old valve out carefully.
- Install the new fill valve: Place the new fill valve in the same position as the old one. Secure it with the lock nut and ensure it’s tight.
- Reconnect the water supply line: Tighten the nut connecting the water supply line to the new fill valve.
- Turn on the water supply: Turn the shut-off valve counterclockwise to restore water flow. Check for leaks.
- Test the new fill valve: Flush the toilet and ensure the tank fills properly. Adjust the valve if necessary.
Choosing The Right Replacement Valve
Choosing the right fill valve is crucial for proper toilet function. Here are some factors to consider:
- Compatibility: Ensure the fill valve fits your toilet model.
- Adjustability: Select a valve with adjustable height for better fit.
- Noise reduction: Some valves are designed to operate quietly.
- Durability: Look for valves made from high-quality materials for longevity.
Use the table below to compare different types of fill valves:
| Type | Pros | Cons |
|---|---|---|
| Float Cup | Easy to adjust, common type | May be noisy |
| Floatless | Quiet operation, modern design | More expensive |
| Diaphragm | Durable, less prone to leaks | Harder to install |
Fine-tuning After Installation
After installing a new fill valve, it’s crucial to fine-tune it for optimal performance. Fine-tuning ensures your toilet operates efficiently and conserves water. Let’s dive into the key steps for perfecting your fill valve setup.
Water Level Adjustment
The water level should be set correctly to avoid overflow. To adjust, find the float mechanism on the fill valve. Turn the adjustment screw to raise or lower the float.
| Step | Action |
|---|---|
| 1 | Locate the float mechanism |
| 2 | Turn the adjustment screw clockwise to lower the water level |
| 3 | Turn the adjustment screw counterclockwise to raise the water level |
| 4 | Flush the toilet to test the new water level |
Flow Rate Calibration
Calibrating the flow rate ensures your toilet fills quickly but doesn’t waste water. Start by turning the flow rate knob on the fill valve. Adjust the knob until the desired flow rate is achieved.
- Turn the knob clockwise to decrease the flow rate
- Turn the knob counterclockwise to increase the flow rate
Test the flow rate by flushing the toilet. Make small adjustments until the fill time is optimal.
Remember, proper calibration saves water and reduces utility bills.
Troubleshooting Post-repair Issues
Once you fix your toilet’s fill valve, new problems might arise. These can include leaks or a toilet that keeps filling. Let’s explore how to tackle these common issues.
Dealing With Leaks
Leaks can happen after a fill valve repair. First, check the connections.
- Ensure the fill valve is tightly secured to the tank.
- Verify that the washer is properly placed and not damaged.
- Inspect the supply line for any wear or cracks.
If the connections are fine, move on to the fill valve itself. Look for any cracks or defects.
Use a towel to dry the area and pinpoint the leak’s source. A small drip can mean a faulty washer or a loose connection.
When The Toilet Won’t Stop Filling
A toilet that won’t stop filling can be annoying. Here are some steps to troubleshoot:
- Check the float height. Adjust it to the correct level.
- Inspect the fill valve for debris. Clean it if necessary.
- Ensure the refill tube is not inserted too far into the overflow pipe.
If the problem persists, the fill valve might be defective. Replace it if you see no improvement.
| Issue | Possible Cause | Solution |
|---|---|---|
| Leak | Loose connection | Tighten connections |
| Leak | Worn washer | Replace washer |
| Continuous filling | Incorrect float height | Adjust float |
| Continuous filling | Debris in fill valve | Clean fill valve |
By following these steps, you can resolve most post-repair issues. Your toilet should function properly again.
Maintenance Tips For Fill Valves
Proper maintenance of your toilet’s fill valve is essential. It ensures efficient operation and prevents water wastage. Regular upkeep can extend the life of your fill valve and save you from costly repairs. Below are essential maintenance tips to keep your fill valve in top shape.
Regular Cleaning
Regular cleaning of the fill valve is important. It helps in removing debris and mineral buildup. Use a soft brush or cloth for cleaning. Follow these steps for effective cleaning:
- Turn off the water supply.
- Flush the toilet to empty the tank.
- Remove the fill valve cap.
- Clean the valve with a soft brush.
- Reassemble the valve and turn on the water supply.
Preventive Checks
Conducting preventive checks can help identify potential issues early. This can prevent major problems. Key checks include:
- Inspecting for leaks around the fill valve.
- Ensuring the fill valve is securely attached.
- Checking the water level in the tank.
Use the table below to track your maintenance schedule:
| Check | Frequency |
|---|---|
| Cleaning | Every 3 months |
| Inspect for Leaks | Monthly |
| Water Level Check | Every 6 months |
Follow these tips to ensure your fill valve runs smoothly. Regular maintenance can prevent most toilet troubles.
When To Call A Professional
Toilet fill valves can sometimes be a bit tricky. Some issues may need more than a simple DIY fix. Knowing when to call a professional can save time and prevent bigger problems. Here, we will discuss complex problems and the advantages of professional help.
Complex Problems Beyond Diy
Some fill valve problems are too complex for a DIY solution. These include:
- Persistent leaks
- Unusual noises
- Continuous running water
- Weak flush
A professional can identify and fix these issues quickly. They have the right tools and knowledge. Trying to fix them yourself might worsen the problem.
Advantages Of Professional Help
Hiring a professional has many benefits:
| Benefit | Description |
|---|---|
| Expertise | Professionals have extensive training and experience. |
| Time-saving | They can diagnose and fix issues swiftly. |
| Proper Tools | They use specialized tools for accurate repairs. |
| Prevent Future Issues | They ensure the problem won’t recur soon. |
Calling a professional ensures your toilet functions well. It also gives you peace of mind.
Frequently Asked Questions
How Do I Fix A Toilet Fill Valve?
To fix a fill valve, turn off water supply, drain the tank, replace the valve, and reconnect water supply.
Why Is My Toilet Fill Valve Noisy?
A noisy fill valve often indicates debris or wear. Clean or replace it to resolve the noise issue.
What Causes A Toilet Fill Valve To Leak?
A leaking fill valve is usually due to a faulty seal or worn-out parts. Replace or repair the valve to stop leaks.
How Often Should Fill Valves Be Replaced?
Fill valves should generally be replaced every 5-7 years or when they show signs of wear and malfunction.
Can A Fill Valve Affect Water Usage?
Yes, a malfunctioning fill valve can cause continuous water flow, leading to increased water usage and higher bills.
Conclusion
Fixing a faulty fill valve can save you time and money. Follow these simple steps to troubleshoot common issues. Maintaining your toilet ensures it works efficiently. Keep your bathroom in top shape by addressing problems promptly. Stay proactive and enjoy a hassle-free bathroom experience.