
Is your Zebra S4M label printer acting up? You’re not alone.
Many users face issues with this reliable printer. Whether it’s printing errors, connectivity issues, or hardware malfunctions, troubleshooting your Zebra S4M can be frustrating. But don’t worry, this guide is here to help. We’ll walk you through common problems and their solutions.
By the end, you’ll have the knowledge to fix most issues yourself. This can save you time and reduce downtime. So, let’s dive in and get your printer back on track!
Printer Not Powering On
Encountering issues with your Zebra S4M Label Printer not powering on can be frustrating. This problem can halt your productivity and cause delays. Fortunately, there are several steps you can take to troubleshoot and resolve the issue. Let’s dive into the basics of ensuring your printer is properly powered.
Checking Power Connections
First things first, ensure that all power connections are secure. Sometimes, a loose cable can be the culprit. Check that the power cord is firmly plugged into both the printer and the wall outlet.
It’s also a good idea to inspect the outlet itself. Plug another device into the same outlet to ensure it’s working. If the outlet is faulty, try using a different one.
Inspecting Power Supply
If the power connections are secure, the next step is to inspect the power supply. Look for any visible damage to the power cord or power supply unit. Frayed wires or a broken power brick can prevent your printer from powering on.
Consider borrowing a power supply from a colleague or friend who has the same model. This can help you determine if the issue lies with the power supply itself.
Have you encountered any unusual power surges recently? These can sometimes damage the power supply. A quick check with a multimeter can confirm if it’s functioning correctly.
By following these steps, you can often identify and resolve the power issues with your Zebra S4M Label Printer. Keep your workspace productive and efficient by ensuring all connections and components are in good condition.
Label Feed Problems
The Zebra S4M Label Printer is efficient but sometimes faces label feed problems. This section will guide you through ensuring proper label loading and adjusting label sensors. These steps can help resolve most label feed issues.
Ensuring Proper Label Loading
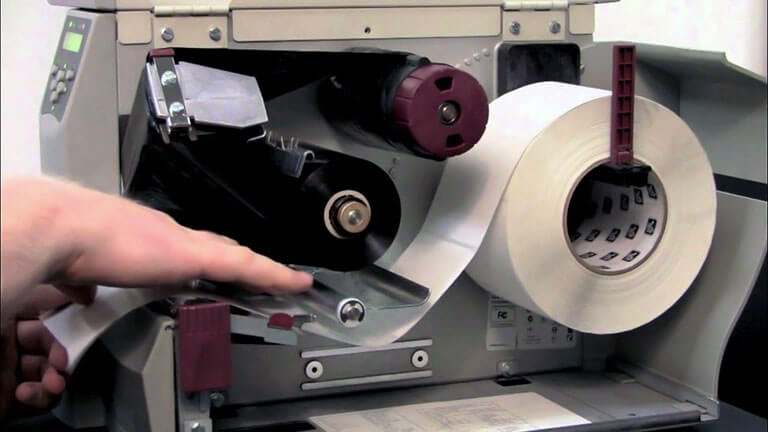
First, check if the labels are loaded correctly. Open the printer and inspect the label roll. Make sure the roll is placed on the spindle without any misalignment. The labels should face up and feed under the guides smoothly. Also, ensure the edge of the labels aligns with the printer’s edge.
Next, check the tension of the label roll. It should not be too tight or too loose. Adjust the roll so it can move freely but stay firm in place. Finally, close the printer cover and test the feed. If the labels feed correctly, the loading process was done right.
Adjusting Label Sensors
Label sensors play a crucial role in the feeding process. Locate the sensors inside the printer. They are usually near the print head. Clean the sensors gently using a soft cloth. Dust and debris can cause incorrect readings.
After cleaning, check the sensor position. The sensors should align with the center of the labels. Use the adjustment screws or levers if needed. Once aligned, run a sensor calibration. Refer to your printer manual for specific calibration steps.
Proper sensor adjustment ensures the printer detects labels accurately. This reduces feed problems and improves print quality.
Poor Print Quality
Have you ever printed a batch of labels only to find them blurry or faint? Poor print quality on your Zebra S4M label printer can be frustrating. Luckily, there are a few simple steps you can take to improve it. Let’s dive into some practical troubleshooting tips.
Cleaning Print Head
One of the most common reasons for poor print quality is a dirty print head. Dirt and residue can accumulate over time, causing your prints to look smudged or faded. To clean the print head, you’ll need a lint-free cloth and some isopropyl alcohol.
First, make sure the printer is turned off and unplugged. Gently wipe the print head with the cloth dampened with alcohol. Allow it to dry completely before powering the printer back on. Regular cleaning can significantly improve print quality and extend the life of your printer.
Adjusting Print Darkness Settings
If cleaning the print head doesn’t solve the problem, you might need to adjust the print darkness settings. This setting controls how much heat is applied to the ribbon, affecting how dark or light your prints appear.
To adjust the print darkness, go to the printer’s settings menu. Look for the “Print Darkness” or “Density” option. Increase the setting incrementally and print test labels until you achieve the desired quality. Be careful not to set it too high, as this can cause the ribbon to burn and damage the print head.
Have you tried these steps and seen improvements? Or is the print quality still lacking? Sometimes, the solution is simpler than you think. Ensuring proper maintenance and making small adjustments can make a significant difference. Don’t let poor print quality slow you down. Take action and get those labels looking sharp!
Printer Not Recognizing Labels
The Zebra S4M label printer is a reliable tool for many businesses. However, sometimes it runs into issues, such as not recognizing labels. This can be frustrating and disrupt your workflow. Let’s dive into some solutions to get your printer back on track.
Calibrating The Printer
One of the first steps you should take is calibrating the printer. Calibration ensures that the printer correctly detects the size and type of labels you are using. Here’s how you do it:
- Turn off the printer.
- Hold down the feed button while turning the printer back on.
- Release the feed button when the status light blinks green.
The printer should now feed and measure the labels. This simple process can solve many recognition issues. If your printer still struggles, it might be time to check the label specifications.
Checking Label Specifications
Ensure that your labels are compatible with the Zebra S4M. Check the label size, gap, and material. Incorrect specifications can cause the printer to misread the labels.
Here are some things to check:
- Label width and length
- Gap between labels
- Material type (e.g., paper, synthetic)
Once, I had a batch of labels that were slightly off in size. The printer struggled until I swapped them out for the correct ones.
Are your labels lined up correctly in the printer? Misalignment can cause the sensor to miss the gaps between labels. Double-check the positioning to avoid this issue.
Have you ever faced a similar problem? How did you solve it? Feel free to share your experiences in the comments.
These quick checks and calibrations can save you a lot of time and hassle. Keep your Zebra S4M running smoothly by regularly maintaining it and using the correct labels.
Communication Errors
Communication errors with your Zebra S4M label printer can halt your operations. These errors occur due to miscommunication between the printer and the computer. Understanding and resolving these issues is crucial. Here are some steps to troubleshoot communication errors.
Verifying Cable Connections
First, check all cable connections. Ensure the power cable is securely plugged into the printer and the outlet. Also, verify the data cable connects firmly to both the printer and the computer. Loose or damaged cables can cause communication errors.
Inspect the cables for any visible damage. Replace any damaged cables immediately. Using high-quality, compatible cables can prevent many communication issues.
Configuring Printer Settings
Next, check the printer settings. Ensure the printer is set to the correct communication mode. Access the printer’s menu and navigate to the communication settings. Select the appropriate mode, such as USB, serial, or parallel, depending on your connection type.
Match the printer settings with the computer’s settings. If using a serial connection, ensure the baud rate, parity, and data bits match on both devices. Misaligned settings can lead to errors.
Test the communication by sending a print command from the computer. If the printer responds, the issue is resolved. If not, consider reinstalling the printer drivers. Updated drivers can fix many communication problems.
Frequent Paper Jams
Frequent paper jams in the Zebra S4M label printer can be frustrating. They disrupt workflow and can be time-consuming to fix. Understanding why paper jams occur and knowing how to troubleshoot them is crucial for keeping your printer running smoothly.
Clearing Paper Path
First, turn off the printer. Open the top cover and check for jammed labels or debris. Gently remove any obstructions. Make sure the label path is clear. Use a flashlight to inspect hard-to-see areas. Do not use sharp tools to remove jams. They can damage the printer.
Inspecting Rollers
Inspect the rollers for wear or damage. Worn rollers can cause paper jams. Clean the rollers with a lint-free cloth and a mild solvent. Rotate the rollers by hand to check for smooth movement. Replace any damaged or excessively worn rollers. Regular maintenance helps prevent frequent jams.
Firmware And Software Issues
Firmware and software issues can be frustrating when working with your Zebra S4M Label Printer. These problems can cause printing errors, connectivity issues, or even complete printer failures. Luckily, there are practical solutions that can resolve most of these issues.
Updating Firmware
Updating your printer’s firmware can address many common problems. Firmware updates often include bug fixes and performance improvements.
To update the firmware, visit the Zebra website and download the latest firmware version for the S4M model. Ensure your printer is connected to your computer.
Follow the instructions provided with the firmware download. Typically, this involves running an executable file and following on-screen prompts. Always make sure to backup your settings before starting the update.
Reinstalling Printer Drivers
If your printer is not responding or printing correctly, the issue might be with the printer drivers. Reinstalling the drivers can help.
First, uninstall the current printer driver from your computer. You can do this through the Device Manager or the Control Panel.
Next, download the latest driver from the Zebra website. Install the new driver by following the on-screen instructions. Restart your computer and reconnect your printer.
Have you ever faced a persistent issue that was resolved by simply updating firmware or reinstalling drivers? Share your experience in the comments!
Frequently Asked Questions
How To Reset Zebra S4m Printer?
To reset a Zebra S4M printer, turn off the printer. Press and hold the Pause and Feed buttons. While holding, turn the printer back on. Release the buttons when the data light turns green. The printer will reset to factory settings.
Why Is My Zebra Label Printer Not Printing?
Your Zebra label printer might not be printing due to connectivity issues, outdated drivers, or misaligned labels. Ensure the printer is properly connected, check for software updates, and verify the labels are correctly loaded.
How To Calibrate Zebra S4m Printer?
To calibrate a Zebra S4M printer, access the printer’s menu. Select “Calibrate Media” and follow on-screen instructions.
How Do I Clean My Zebra Printer Sensor?
To clean your Zebra printer sensor, turn off the printer. Use a lint-free cloth and isopropyl alcohol to gently wipe the sensor. Ensure it’s completely dry before turning the printer back on.
Why Won’t My Zebra S4m Printer Turn On?
Check the power cable connection. Ensure it’s plugged in properly. Verify the power outlet works.
Conclusion
Solving Zebra S4M printer issues can be straightforward. By following these tips, you can fix common problems. Remember to check connections and settings regularly. Clean the printer parts to avoid jams. Update software for better performance. Replace worn-out components as needed.
Regular maintenance ensures smooth operation. With proper care, your Zebra S4M printer will work efficiently. Troubleshooting becomes easier with practice and patience. Happy printing!