
Is your dryer heating up but leaving your clothes damp? That frustrating situation happens more often than you might think, and it’s usually due to poor airflow or a simple blockage.
When your dryer heats without drying, it’s not just wasting energy — it’s also keeping your clothes wet and prolonging your laundry time. But don’t worry, you don’t have to call a repair technician right away. You can troubleshoot and fix many of these issues yourself with a few easy checks.
You’ll discover the common reasons why your dryer heats but doesn’t dry, plus step-by-step tips to get your laundry back on track fast. Keep reading—your perfectly dry clothes are closer than you think!
Check The Lint Trap
Check the lint trap before assuming your dryer is broken. The lint trap catches fibers from clothes during drying. When clogged, it blocks airflow inside the dryer. Poor airflow causes clothes to stay wet, even if the dryer heats up. Cleaning the lint trap improves drying efficiency. Follow these steps to clean it properly.
Remove And Clean The Filter
Pull out the lint filter from your dryer. Use your fingers or a soft brush to remove lint. Make sure the filter is completely clear before putting it back. A clean filter lets air flow freely through the dryer.
Wash With Soap And Water
Sometimes lint and residue build up on the filter screen. Wash it in warm water with mild soap. Gently scrub with a soft brush to remove dirt. Rinse well and let it dry fully before reinserting it into the dryer.
Vacuum The Lint Trap Housing
Lint can also collect inside the lint trap housing. Use a vacuum with a narrow nozzle to clean inside the opening. Remove any loose fibers or dust that block airflow. This step helps your dryer work better and dry clothes faster.
Inspect The Vent Hose
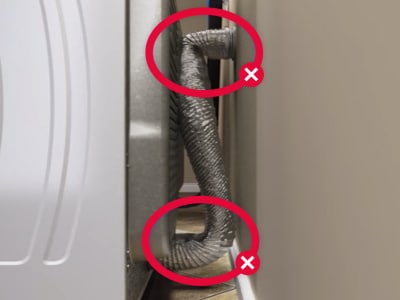
Checking the vent hose is a key step when your dryer heats but fails to dry clothes. The vent hose moves hot, moist air outside. If blocked or damaged, airflow slows down. This traps moisture inside, leaving clothes damp.
Inspecting the vent hose can reveal simple problems to fix. It might be bent, crushed, or clogged. These issues reduce air movement and dryer efficiency. Follow the steps below to find and solve vent hose issues.
Look For Kinks Or Crushing
Start by examining the vent hose from the dryer to the wall. Look closely for kinks or crushed sections. These block air flow and reduce drying power. Straighten any bends and fix crushed parts. A smooth hose helps air move freely and dry clothes faster.
Test Airflow At The Hose
Next, test airflow at the hose exit. Turn on the dryer and feel for strong air blowing out. Weak airflow means a blockage or leak. Check both inside and outside vents. Clear any debris or nests that block air. Good airflow is vital for drying performance.
Clean The Vent Hose Thoroughly
Finally, clean the vent hose inside and out. Detach it from the dryer and wall. Use a long brush or vacuum to remove lint and dirt. Clean both ends carefully. Regular cleaning prevents buildup that traps moisture. A clean hose boosts your dryer’s drying ability.
Clear The Exterior Exhaust
Clearing the exterior exhaust is key to fixing a dryer that heats but does not dry. The vent outside your home helps remove moist air from the dryer. If this vent is blocked, air cannot escape properly. Moist air stays inside, keeping clothes damp. Simple cleaning can improve airflow and drying performance.
Locate The Outside Vent
Find the vent on the outside wall of your home. It is usually near the ground or on the roof. Look for a small cover with a flap or grille. This is where the dryer pushes out hot, moist air. Knowing its location helps you clean it effectively.
Remove Lint And Debris
Check the vent cover for lint, leaves, or dirt blocking the opening. Use a brush or vacuum to clear away all debris. Remove any buildup inside the vent pipe as well. This frees airflow and helps the dryer work better. Clean the vent regularly to avoid clogs.
Check Flapper Movement
The vent cover usually has a flapper that opens when the dryer runs. Make sure the flapper moves freely and closes tightly when off. A stuck flapper can trap moist air inside your home or let pests in. Gently clean around the flap to ensure smooth motion.
Check The Dryer Drum
Checking the dryer drum is an important step when the dryer heats but does not dry clothes. The drum must turn properly to tumble clothes. Tumbling helps air reach all fabric surfaces. Without movement, clothes stay wet despite heat.
Issues with the drum can block airflow or prevent tumbling. These problems keep moisture trapped. Fixing the drum can restore drying efficiency quickly and cheaply.
Observe Drum Movement
Start by opening the dryer door. Turn the drum by hand. It should move smoothly and easily. Any resistance or rough sounds mean trouble. Then, run the dryer empty and watch the drum spin. It should rotate steadily without stopping. Stalling or slow spinning shows a problem. The drum’s motion spreads clothes and lets hot air flow around them. No movement means no proper drying.
Identify Belt Issues
The drum belt wraps around the drum and motor pulley. It spins the drum during drying cycles. A broken or loose belt stops the drum from turning. To check, remove the dryer’s front panel or access panel. Look at the belt around the drum. If it is snapped or slipped off, replace it. A worn belt can slip and cause slow drum movement. Fixing or replacing the belt restores drum rotation and improves drying.
Test The Moisture Sensor
Testing the moisture sensor is a key step if your dryer heats up but clothes stay wet. This sensor tells the dryer when clothes are dry. A faulty or dirty sensor can confuse the machine. It may stop drying too soon or run too long. Check the sensor for damage or dirt. Proper care can fix many drying problems.
Locate Sensor Bars
Find the moisture sensor bars inside the dryer drum. They are usually metal strips. Look near the lint trap or on the drum wall. These bars detect moisture by touching wet clothes. Knowing their location helps with cleaning and testing.
Clean Sensor Bars
Wipe the sensor bars with a soft cloth and mild soap. Remove any residue from fabric softener or lint. Dirty bars send wrong signals to the dryer. Clean sensors improve drying performance and save energy. Dry the bars well before using the dryer again.
Adjust Sensor Settings
Some dryers let you change the moisture sensor settings. Check your dryer’s manual for instructions. Adjust the sensor sensitivity if clothes are still damp. Lower sensitivity helps with small loads. High sensitivity can over-dry clothes. Set it to match your typical laundry loads.
Examine The Heating Element
The heating element is a crucial part of your dryer. It produces the heat needed to dry your clothes. If your dryer heats up but does not dry, the heating element might be damaged or broken. Checking this part can help you find the problem fast.
Heating elements can wear out over time or break due to electrical issues. A faulty heating element may still get warm but won’t heat enough to dry clothes properly. Testing the heating element is a simple and effective way to find out if it needs repair or replacement.
Test For Continuity
Unplug the dryer before testing the heating element. Safety first. Use a multimeter set to the continuity setting. Remove the heating element from the dryer’s back panel. Touch the multimeter probes to each terminal of the heating element. A beep or zero reading means the element has continuity and works well. No sound or infinite reading shows a broken heating element. This test lets you know if the heating element is damaged inside.
Replace If Faulty
Buy a replacement heating element that matches your dryer model. Remove the old heating element carefully. Install the new one in the same place. Connect all wires tightly. Secure the panel back onto the dryer. Plug the dryer in and run a test cycle. The dryer should heat and dry clothes properly now. Replacing a faulty heating element often restores your dryer’s drying power quickly and cheaply.
Review Dryer Settings
Sometimes the dryer heats but does not dry clothes properly. Checking the dryer settings can solve this problem. Settings control how the dryer works. A wrong setting may cause your clothes to stay wet.
Reviewing these settings ensures the dryer runs as expected. It helps avoid wasting time and energy on damp clothes. Two key settings to check are the temperature controls and the load size.
Check Temperature Controls
Temperature controls decide how hot the dryer gets. If the temperature is set too low, clothes won’t dry well. Some dryers have settings like “Low,” “Medium,” and “High.” Choose a higher setting for heavy fabrics.
For delicate items, use a lower temperature to avoid damage. Make sure you select the right setting for your laundry type. Incorrect temperature settings can cause damp clothes even if the dryer heats up.
Avoid Overloading The Dryer
Overloading restricts airflow inside the dryer drum. Without good airflow, moisture stays trapped in clothes. This makes drying slow or ineffective. Fill the dryer only about half to three-quarters full.
Smaller loads dry faster and more evenly. Large, heavy loads need more time and heat. Proper load size helps the dryer remove moisture efficiently. Avoid stuffing the dryer to improve drying performance.
Maintain Proper Airflow
Proper airflow is key when your dryer heats up but doesn’t dry clothes. Air moves moisture from wet clothes to the outside. Without good airflow, damp air stays trapped inside. This keeps clothes wet, even if the dryer is hot. Check airflow regularly to keep your dryer working well and drying quickly.
Regularly Clean Lint Traps And Vents
Start by cleaning the lint trap after every use. A blocked lint trap stops air from flowing freely. Pull out the lint screen and remove all lint. Wash the screen with warm water and mild soap once a month. Also, check the dryer vent outside your home. Lint can build up there and block air. Clear vents at least twice a year to avoid clogs.
Schedule Annual Professional Cleaning
Some lint and dirt build up deep inside vents and ducts. Professionals have tools to clean these hidden spots well. Have your dryer vents and ducts cleaned once a year. This keeps air flowing smoothly and reduces fire risks. Professional cleaning helps your dryer dry clothes faster and last longer.
Frequently Asked Questions
How Much To Repair A Dryer Sensor?
Repairing a dryer sensor typically costs between $50 and $150, including parts and labor. Prices vary by model and location.
How To Manually Reset A Dryer?
To manually reset a dryer, unplug it for one minute. Then, plug it back in and press the reset button if available. This clears minor errors and restarts the system. Check your model’s manual for specific reset instructions.
What Are The Symptoms Of A Blown Thermal Fuse?
Symptoms of a blown thermal fuse include the dryer not heating, no power to the heating element, and the dryer stopping mid-cycle. Clothes remain wet despite the dryer running. The dryer may start but fail to produce heat or shut off unexpectedly.
How To Tell If A Dryer Is Going Bad?
Signs a dryer is going bad include clothes taking longer to dry, unusual noises, and overheating. Poor airflow and frequent shutdowns also indicate problems. Check for clogged vents, faulty heating elements, or broken drum belts to identify issues early.
Why Is My Dryer Heating But Clothes Stay Wet?
Poor airflow often causes this issue. Check for clogged lint traps or blocked vents. Moist air must escape to dry clothes properly.
Conclusion
A dryer heating but not drying usually means airflow problems. Clean the lint trap and vent hose often. Check for any kinks or blockages in the vent pipe. Small fixes can improve drying performance quickly. Regular maintenance keeps your dryer working well longer.
Act early to avoid bigger, costly repairs later. Keep your clothes dry and your dryer efficient. Simple steps make a big difference in drying results.