
A garage door is one of the most used parts of any home, yet its safety system is rarely noticed until something goes wrong. One common issue that puzzles many homeowners is the garage door sensor yellow light. This small detail can cause the entire garage door to stop working, putting daily routines on hold. If you’ve ever found yourself staring at a yellow sensor, unsure what it means or how to fix it, you’re not alone. Understanding the purpose of the yellow light, what it signals, and how to address its problems can save you time, money, and frustration.
In this article, you’ll discover everything you need to know about garage door sensor yellow lights. We’ll explain what the yellow light means, how garage door sensors work, why this issue happens, and how to troubleshoot it yourself. You’ll also learn when it’s necessary to call a professional, how to prevent sensor problems in the future, and common myths that can mislead you. By the end, you’ll have the practical knowledge to keep your garage door operating safely and reliably.
How Garage Door Sensors Work
Garage door sensors are a critical safety feature designed to prevent the door from closing on people, pets, or objects. Most modern garage doors use a photoelectric sensor system, which consists of two units mounted near the bottom of the garage door tracks on either side.
One sensor emits an infrared beam (the “sender”), while the other receives it (the “receiver”). When the door is closing, if anything interrupts this invisible beam, the system immediately stops or reverses the door. This technology has been required on all automatic garage doors in the United States since 1993.
Key Parts Of The Sensor System
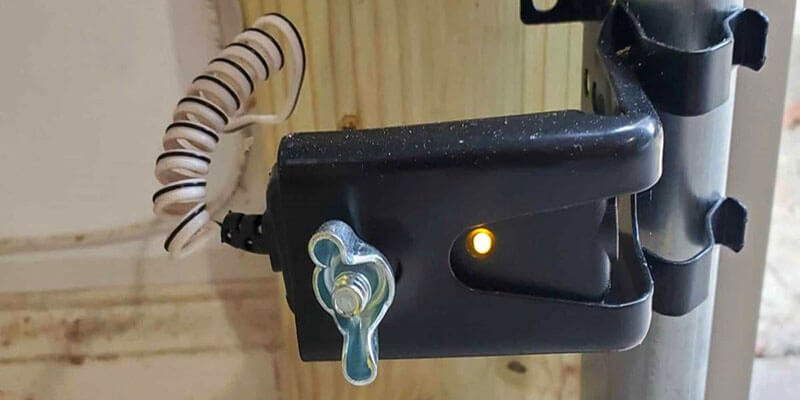
- Sender sensor: Emits the infrared beam, often marked with a yellow or amber light.
- Receiver sensor: Detects the beam, usually shows a green or red light when working properly.
- Wiring: Connects both sensors to the garage door opener motor.
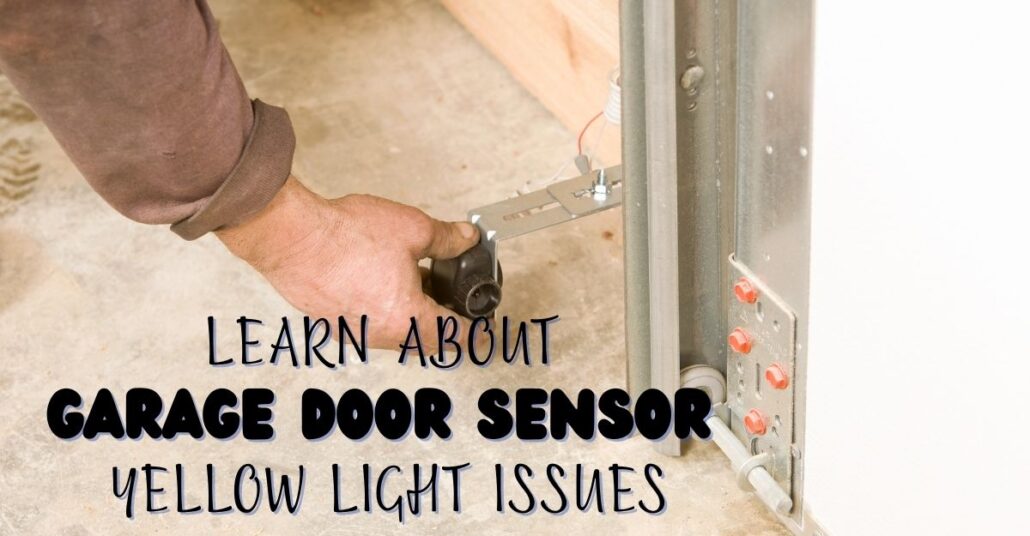
- Mounting brackets: Hold the sensors in alignment about 4-6 inches above the floor.
Garage door sensors use a simple idea, but even a small misalignment or wiring issue can cause the system to stop working. The yellow light is not just a random color; it has a specific meaning in most brands, especially Chamberlain, LiftMaster, and Craftsman.
What Does The Garage Door Sensor Yellow Light Mean?
When you see a yellow light on your garage door sensor, it usually tells you about the sensor’s current status. However, the meaning can change depending on the garage door opener brand and the behavior of the light.
Common Meanings Of Yellow Light
- Sender Sensor Power: For Chamberlain, LiftMaster, and Craftsman, the yellow (or amber) light means the sender sensor has power and is working.
- Misalignment Warning: Sometimes, a yellow light may blink or look dim, showing the sensors are misaligned or something is blocking the beam.
- Fault Indicator: Rarely, a steady or blinking yellow light can signal a wiring problem or failed sensor.
It’s important to check your garage door opener’s manual for the exact meaning in your model. Still, in most cases, a solid yellow light means the sender is powered, while a blinking yellow light points to a problem.
Sensor Light Color Guide
Here’s a simple guide comparing what different sensor lights mean:
| Light Color | Sensor Type | What It Means |
|---|---|---|
| Solid Yellow/Amber | Sender | Power ON, beam is transmitting |
| Blinking Yellow/Amber | Sender | Misalignment or obstruction |
| Solid Green/Red | Receiver | Beam received, system ready |
| No Light | Either | No power or sensor failure |
If your garage door won’t close and the yellow light is on, it’s a sign that the safety system is stopping the door to prevent an accident.
Why Is My Garage Door Sensor Yellow?
Understanding why your garage door sensor is yellow is the first step to fixing the problem. Here are the most common reasons:
- Normal Operation: A steady yellow light on the sender sensor is expected and shows the sensor is powered.
- Sensor Misalignment: If the yellow light is blinking, the sensors may not be facing each other correctly.
- Obstruction in Path: Anything blocking the infrared beam, like dirt, spider webs, or objects, will cause the sensor to react.
- Wiring Issues: Loose or damaged wires may cause the yellow light to flicker or go out.
- Sunlight Interference: Bright sunlight can sometimes overwhelm the sensor, causing false readings.
- Faulty Sensor: Rarely, a sensor may fail and show a yellow light, even when nothing is wrong with the alignment or wiring.
Example: Real-world Scenario
Imagine you try to close your garage door, but it goes down a few inches and then reverses. You notice the sender sensor has a steady yellow light, while the receiver’s green light is off or blinking. This usually means the sender is fine, but the receiver isn’t getting the beam—often due to misalignment or an obstruction.
How To Troubleshoot A Yellow Garage Door Sensor
Fixing a yellow garage door sensor does not always require a professional. Most problems are simple and can be solved with a few basic tools and a careful approach.
1. Check For Obstructions
Even a small object or a bit of dirt can block the sensor beam. Carefully inspect both sensors and the space between them.
- Remove any boxes, bikes, or objects near the sensors.
- Wipe the sensor lenses gently with a soft cloth to remove dust or cobwebs.
2. Realign The Sensors
Misalignment is the most common reason for sensor trouble. The sensors must face each other directly, or the system won’t work.
- Loosen the mounting bracket screws slightly.
- Adjust each sensor so they point straight at each other.
- Tighten the screws and check if the yellow and green lights are both solid.
3. Inspect Sensor Lights
Watch the lights as you align the sensors. When both are solid (yellow for the sender, green/red for the receiver), the system is working.
- If the yellow light is steady but the green light is out or blinking, the receiver is not getting the beam.
- If both are blinking, check the alignment and for possible wiring issues.
4. Check Sensor Wiring
Wires can loosen over time or be damaged by moisture, pests, or accidental bumps.
- Look for loose, frayed, or broken wires at the sensor and garage door opener.
- Ensure all wire connections are tight and secure.
- If wires are damaged, they may need to be replaced or reconnected.
5. Test The Door
After cleaning, aligning, and checking the wires, test the garage door. Use the wall button or remote to close the door and watch the sensor lights.
- If the door works, the problem is fixed.
- If not, repeat the steps or move to more advanced checks.
6. Rule Out Sunlight Interference
In some cases, direct sunlight can overwhelm the sensor’s receiver.
- Try shading the sensor with your hand or a small object.
- If the light turns solid and the door works, sunlight is the culprit.
- Consider installing a sun shield or moving the sensor slightly if possible.
7. Replace The Sensors
If all else fails and you still see a yellow light with no function, the sensors may be faulty.
- Purchase compatible replacement sensors for your garage door brand.
- Install them according to the manufacturer’s instructions.
- Make sure to disconnect power before working on the wiring.
Troubleshooting Steps Summary
Here’s a quick-reference summary in table form:
| Issue | What to Check | Possible Fix |
|---|---|---|
| Steady yellow, no green | Alignment, obstructions | Clean/align sensors |
| Blinking yellow | Alignment, wiring | Realign, check wires |
| No lights | Power, wiring | Restore power, fix wires |
| Works in shade only | Sunlight interference | Add sun shield |

When To Call A Professional
Many garage door sensor yellow issues can be solved at home, but not all problems are DIY friendly. Knowing when to call for professional help can save time and prevent further damage.
Signs You Need An Expert
- Wiring Damage: If the wires are frayed, burned, or chewed, it’s safer to have a technician repair or replace them.
- Repeated Failures: If you fix the alignment or clean the sensors and the problem returns, there may be a deeper issue.
- Sensor Replacement: If you’re not comfortable working with electrical wiring, hire a professional to replace sensors.
- Garage Door Opener Problems: Sometimes, the opener’s control board or logic system fails, causing sensor issues.
Cost Of Repairs
Basic sensor alignment or cleaning is free if you do it yourself. Professional repairs vary:
- Sensor alignment: $50–$100
- Sensor replacement: $100–$200 (parts and labor)
- Wiring repair: $100–$300, depending on complexity
Getting a professional diagnosis is worth the cost if you’re unsure or if the system is under warranty.
Preventing Garage Door Sensor Problems
Keeping your garage door sensors working is easier than fixing them after they fail. Simple habits and regular checks can prevent most common issues.
Regular Cleaning
Dust, dirt, and spider webs are common causes of sensor problems. Clean the sensor lenses gently every month with a soft, dry cloth.
Keep The Area Clear
Don’t store bikes, boxes, or garden tools near the sensors. Even a small item can block the beam and cause the door to malfunction.
Protect From Sunlight
If your garage door faces direct sun, sensors may need a shield. Use a small piece of cardboard or buy sun shields designed for this purpose.
Inspect Wiring
Every few months, check the wires for signs of wear, water damage, or pests. Repair or replace damaged wires quickly.
Test The System
Test your garage door safety system by putting a small box in the path of the sensors and trying to close the door. The door should reverse. If not, troubleshoot immediately.
Upgrade Old Sensors
If your system is more than 10–15 years old, consider upgrading to newer sensors. Modern sensors are less sensitive to sunlight and more reliable.
Common Myths About Garage Door Sensor Yellow Lights
Many homeowners share incorrect advice about yellow garage door sensors. Let’s clear up some popular myths.
Myth 1: The Yellow Light Means Something Is Wrong
Fact: For most brands, a steady yellow light on the sender sensor is normal and means it’s powered.
Myth 2: You Can Bypass The Sensor Safely
Fact: Disabling or bypassing garage door sensors is dangerous and may be illegal. The sensors are there to prevent accidents.
Myth 3: Only Dust Causes Sensor Problems
Fact: While dirt is a common cause, misalignment, wiring issues, and sunlight can all affect sensors.
Myth 4: Both Sensors Should Have The Same Light Color
Fact: Most systems use yellow/amber for the sender and green/red for the receiver. Different colors are normal.
Myth 5: Sensors Don’t Need Maintenance
Fact: Like any part of your home, sensors need cleaning and inspection to stay reliable.
Choosing Replacement Garage Door Sensors
If you need to replace your sensors, picking the right type is key. Not all sensors work with every opener.
What To Look For
- Brand Compatibility: Always match the sensor brand with your garage door opener. Chamberlain, LiftMaster, and Craftsman sensors are often interchangeable, but Genie, Linear, and others require their own sensors.
- Wiring Type: Some systems use two wires, others use three. Check your opener before buying.
- UL 325 Compliance: Make sure new sensors are UL 325 listed, which means they meet modern safety standards.
- Included Hardware: Good replacement kits come with mounting brackets, screws, and clear instructions.
- Warranty: Sensors with a 1-year or longer warranty offer peace of mind.
Example Comparison
Here’s a quick look at two popular replacement sensors:
| Feature | Chamberlain/LiftMaster | Genie |
|---|---|---|
| Compatibility | Chamberlain, LiftMaster, Craftsman | Genie only |
| Light Colors | Yellow (sender), green (receiver) | Red (both) |
| Wiring | 2-wire | 2-wire |
| UL 325 Listed | Yes | Yes |
Never assume all sensors are the same—always check your owner’s manual or contact the manufacturer.
Real-life Examples And Case Studies
Case 1: Misalignment After Cleaning
A homeowner in Texas cleaned his garage during spring cleaning and accidentally bumped the sensors. The next day, the garage door wouldn’t close, and the yellow light was blinking. Realigning the sensors fixed the problem in five minutes.
Case 2: Sunlight Interference
A customer in California noticed the garage door worked in the morning but not in the afternoon. The yellow light was steady, but the green light went out when the sun shone directly on the receiver. A simple sun shield solved the issue.
Case 3: Wiring Damage
In Illinois, a family found that their garage door sensors would work one day, then fail the next. Inspection revealed mice had chewed the wires. Replacing the wires and adding protective tubing restored normal operation.
Case 4: Sensor Failure
A homeowner in Florida replaced both sensors after the yellow light stayed on, but the system still failed. It turned out the opener’s control board was faulty. A technician replaced the board, and the sensors worked again.
These examples show that sometimes the obvious fix is all you need, but occasionally a deeper issue is involved.
Safety Tips For Working With Garage Door Sensors
Whenever you’re working around a garage door, safety comes first. Here are a few practical tips:
- Turn off power to the garage door opener before touching wires.
- Never bypass sensors even for a short period.
- Use a sturdy ladder when adjusting sensors to avoid falls.
- Keep children and pets away from the work area.
- Read the manual for your specific opener before making changes.
The Importance Of Working Sensors
Garage door sensors are not just a modern convenience—they are a legal requirement and a key safety feature. According to the U. S. Consumer Product Safety Commission, garage doors cause thousands of injuries each year. The sensor system prevents doors from closing on people, pets, and objects, reducing accidents and property damage.
If you notice a yellow sensor light, don’t ignore it. Even if your garage door still works, a faulty sensor may fail to protect you when it matters most.
Frequently Asked Questions
What Does A Yellow Light On My Garage Door Sensor Mean?
A yellow light usually means your sender sensor is powered and working. On most systems, yellow is normal for the sender, while the receiver shows green or red. If the yellow light is blinking, it may mean misalignment or an obstruction.
Why Won’t My Garage Door Close When The Sensor Is Yellow?
If the yellow sensor is steady but the garage door won’t close, the receiver sensor might not be getting the beam, usually because of misalignment, dirt, or something blocking the path. Check both sensors and make sure they are clean and facing each other.
Can I Bypass The Garage Door Sensors If The Yellow Light Stays On?
It’s not safe or legal to bypass your garage door sensors. They are a safety feature required by law. If you have ongoing problems, fix the sensors or call a professional instead of bypassing them.
How Do I Realign Garage Door Sensors?
To realign, loosen the mounting screws on both sensors, adjust them so they face each other directly, and tighten the screws. Watch for both the yellow and green lights to stay solid, which means the sensors are properly aligned.
Where Can I Find More Information About Garage Door Safety Standards?
For official guidelines and safety rules, visit the U.S. Consumer Product Safety Commission website. They offer up-to-date information on garage door sensor requirements and accident prevention.
Keeping your garage door sensors in good condition is simple, but it makes a big difference in your home’s safety and peace of mind. Next time you see a yellow light, you’ll know exactly what to do—and when to call in the experts.