
Is your garbage disposal not draining, leaving you with a sink full of standing water and a frustrating mess? You’re not alone, and the good news is this common problem is often easier to fix than you think.
Whether your disposal is humming but not draining, or water just sits stubbornly in the sink, understanding what’s causing the blockage is the first step to getting things flowing smoothly again. You’ll discover simple, step-by-step solutions to unclog your garbage disposal safely and effectively—no expensive plumber needed.
Keep reading to regain control of your kitchen sink and say goodbye to slow drains for good.

Credit: www.wikihow.life
Power Off And Safety Checks
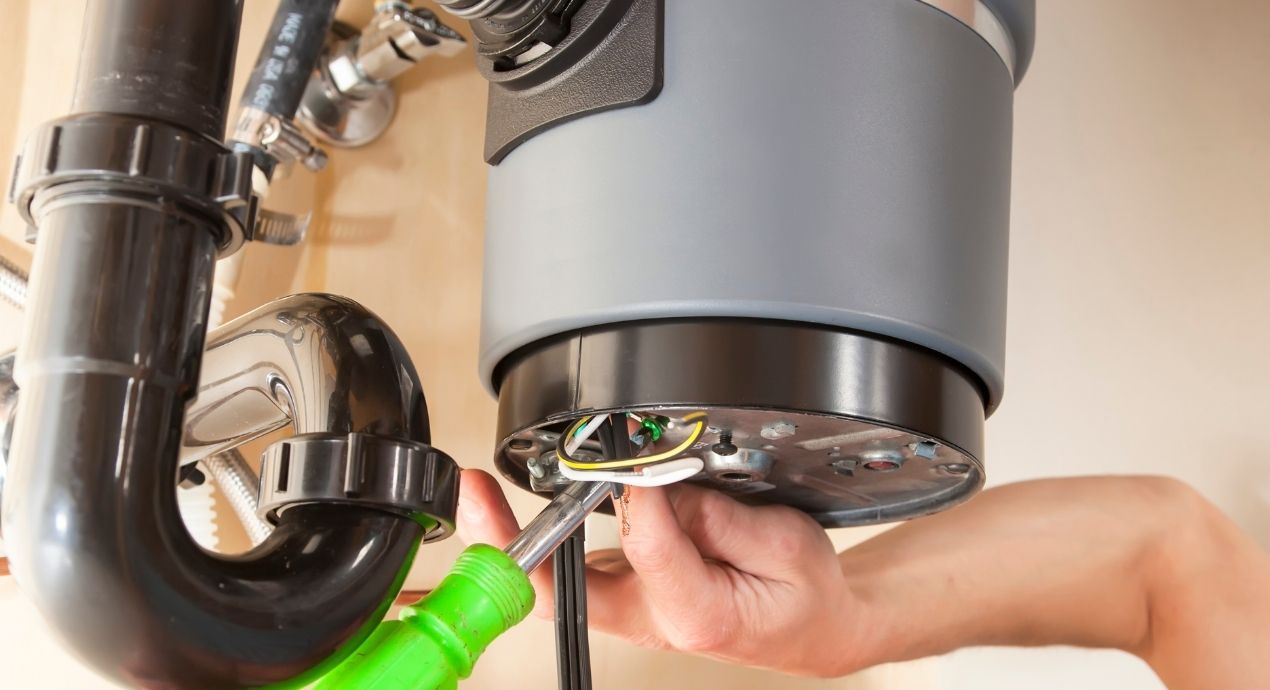
Before working on a garbage disposal that is not draining, safety must come first. Power off and safety checks help prevent accidents and injuries. Always make sure the disposal is completely off before touching anything inside. This step stops the blades from spinning unexpectedly. Clear your workspace and prepare tools like pliers or tongs to remove debris safely.
Shut Off Power At Switch Or Breaker
Locate the wall switch that controls the garbage disposal. Turn it off to cut power to the unit. If unsure, go to the circuit breaker panel. Flip the breaker switch connected to the kitchen or disposal off. Verify the disposal is off by trying to turn it on. No sound or movement means power is off. This step protects you from electric shock and injury.
Remove Visible Debris Safely
Use tongs or needle-nose pliers to reach inside the disposal opening. Never use your hands to remove debris. Pull out any visible food scraps, bones, or objects blocking the blades. Clear the drain opening carefully and slowly. Avoid pushing debris deeper into the disposal. Removing blockage manually helps the unit drain properly once powered back on.
Credit: www.libertyhomeguard.com
Clearing Disposal Jams
Garbage disposal jams often cause your sink to stop draining. Clearing these jams can restore normal function quickly. Avoid using your hands inside the disposal to prevent injury. Instead, follow safe steps to clear the blockage. Proper tools and safety measures make this task easy.
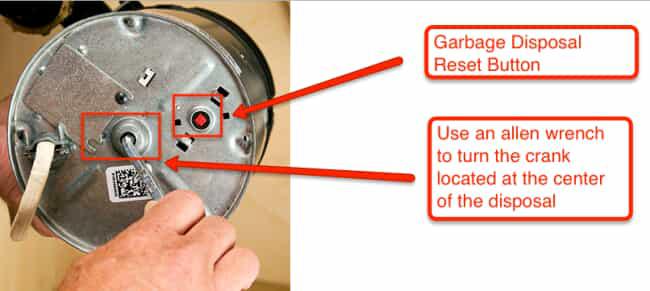
Locate And Use The Hex Wrench
Most garbage disposals have a hex-shaped hole under the unit. This hole fits a hex wrench, often included with your disposal. Insert the wrench into the hole and turn it back and forth. This action helps loosen stuck debris and clears the jam. Keep turning until you feel the blades move freely. Remove the wrench and check if the disposal spins by hand.
Reset The Disposal Unit
After clearing the jam, reset the disposal to restore power. Find the red reset button on the bottom or side of the unit. Press this button firmly until it clicks. This resets the internal circuit breaker and may fix electrical issues. Turn the power back on at the wall switch. Test the disposal by running water and turning it on. If it still does not drain, repeat the steps or check for other blockages.
Dealing With Drain Line Clogs
Drain line clogs often cause garbage disposals to stop draining properly. These blockages can trap food particles, grease, or debris, stopping water from flowing freely. Clearing these clogs restores proper drainage and prevents further damage. This section explains how to spot and fix drain line clogs safely and effectively.
Identify Water Standing In Sink
Check your sink for standing water. Water that drains slowly or not at all signals a clog in the drain line. Look for water pooling around the sink basin or backing up when the disposal runs. This is a clear sign that the drain pipe is blocked and needs attention.
Standing water can also cause bad smells and attract pests. Removing the blockage quickly avoids these problems. Use a flashlight to inspect the drain opening and pipes under the sink for visible obstructions.
Use A Plunger On The Disposal Drain
A plunger can push clogs through the drain line. Fill the sink with enough water to cover the plunger’s cup. Place the plunger over the drain opening firmly, ensuring a tight seal.
Push the plunger up and down rapidly several times. This action creates pressure that can break up and loosen the clog. After plunging, remove the plunger and check if the water drains.
Repeat the process if needed, but avoid using harsh chemicals. These can damage the disposal and pipes. A plunger offers a simple, safe way to clear many common clogs and restore drainage.
Cleaning The P-trap
Cleaning the P-trap is a key step to fix a garbage disposal that is not draining. The P-trap is the U-shaped pipe under your sink. It catches debris and prevents sewer gases from entering your home. Over time, grease and food particles build up inside it. This buildup can block the flow of water and cause drainage problems. Regular cleaning keeps water flowing smoothly and avoids clogs.
Remove And Inspect The U-shaped Pipe
Place a bucket under the P-trap to catch water. Loosen the slip nuts on both ends of the U-shaped pipe. Carefully remove the pipe and check for clogs. Look for food scraps, grease, or other debris stuck inside. Inspect the pipe for cracks or damage that may cause leaks.
Clear Built-up Grease And Debris
Use a bottle brush or old toothbrush to scrub inside the pipe. Warm, soapy water helps dissolve grease. Rinse the pipe thoroughly to remove all residue. For stubborn buildup, soak the pipe in a vinegar and baking soda solution. Avoid using harsh chemicals that can damage pipes and seals.
Reattach And Test The Drain
Put the cleaned P-trap back in place. Tighten the slip nuts by hand, then use pliers for a snug fit. Turn on the water and run the garbage disposal. Check for leaks around the pipe. Observe if the sink drains quickly and smoothly. Repeat cleaning if water still drains slowly.
Avoiding Harmful Chemicals
Using harmful chemicals to clear a garbage disposal can cause serious damage. These chemicals often eat away at pipes and seals inside the disposal unit. Over time, this weakens your plumbing and can lead to leaks. Protect your home by avoiding these risky substances.
Choosing safer cleaning methods helps keep your disposal and pipes in good shape. These options clean effectively without harsh chemicals. They support a longer life for your garbage disposal and plumbing.
Why Not To Use Chemical Drain Cleaners
Chemical drain cleaners contain strong acids or bases. These substances can corrode metal parts inside your disposal. They also harm plastic pipes and seals. The fumes can be dangerous to breathe. Using these cleaners may void your disposal’s warranty. They often do not fix the root problem but just push it deeper. Chemicals can cause burns if they splash on your skin. Avoid them to keep your home safe and your disposal working well.
Safe Alternatives For Cleaning
Use a mix of baking soda and vinegar to clean your disposal. This combination helps break down buildup naturally. Pour boiling water down the drain to flush loosened debris. Citrus peels like lemon or orange freshen the disposal and remove odors. Regularly grinding ice cubes can sharpen disposal blades and clear residue. Manual removal of stuck debris with tongs is safe and effective. These steps keep your disposal clean without harsh chemicals.
Tips For Unjamming Disposal Blades
Unjamming garbage disposal blades is essential when your disposal stops draining. Stuck blades block water flow and cause bad smells. Fixing the jam quickly keeps your kitchen working smoothly. Simple tips and tools can clear the blades safely and fast.
Always turn off the power before starting. Safety first. Use the right methods to avoid damage. Here are clear steps to clean and unjam the blades.
Proper Blade Cleaning Techniques
Remove visible debris using tongs or pliers. Never use your hands inside the disposal. Run cold water while cleaning to flush small particles. Use a long brush or dish scrubber to reach the blades. Avoid harsh chemicals, as they can harm the disposal parts. Instead, use mild soap and warm water. Clean regularly to prevent future jams and buildup.
Tools To Use For Clearing Blades
A hex wrench is perfect for turning stuck blades from the bottom. Insert the wrench into the hole under the disposal and twist gently. Use needle-nose pliers or tongs to pull out trapped objects. A flashlight helps to see inside the disposal clearly. Avoid using metal objects like screwdrivers that can damage blades. A wooden spoon handle works well to push or move debris safely.
When To Replace Your Garbage Disposal
Knowing when to replace your garbage disposal can save time and avoid frustration. Some issues can be fixed with simple repairs. Others mean the unit is beyond repair. Replacing your disposal improves kitchen hygiene and prevents leaks or clogs.
Assess the condition of your disposal carefully. Frequent breakdowns or poor performance signal replacement time. A new unit also offers better efficiency and quieter operation. Choose a model that fits your needs and budget.
Signs Of Irreparable Damage
Listen for loud grinding or rattling sounds during use. These noises often mean internal parts are broken. Check for persistent leaks under the sink. Water damage to the cabinet or floor is a bad sign. Frequent jams or slow draining despite cleaning point to wear. If the disposal won’t start at all, the motor might be dead. Rust inside the grinding chamber also shows serious damage.
Choosing A Replacement Unit
Pick a disposal with enough power for your household size. Models range from 1/3 to 1 horsepower motors. Look for units with noise reduction features for quiet use. Check the warranty period and customer reviews for reliability. Consider energy-efficient models to save on electricity. Easy installation and compatibility with your sink are important. Some models include helpful extras like anti-jam mechanisms or stainless steel components.
Credit: www.benjaminfranklinplumbing.com
Frequently Asked Questions
How To Fix A Garbage Disposal That Won’t Drain?
Turn off power, remove debris with pliers, use an Allen wrench to free jammed blades, reset the unit, and plunge the drain if needed.
How To Unclog A Garbage Disposal With Standing Water?
Turn off power to the disposal. Remove debris with pliers. Use a plunger over the drain with standing water. Rotate blades manually with a wrench if jammed. Check and clear the P-trap for blockages. Restore power and press the reset button.
Test disposal with running water.
Why Is My Sink Not Draining But No Blockage?
Your sink may not drain due to venting issues, slow drainage pipes, or partial clogs not easily visible. Check air vents and clean pipes.
Why Should You Never Use Baking Soda And Vinegar To Unclog A Drain?
Never use baking soda and vinegar to unclog drains. Their reaction creates foam that can worsen blockages and damage pipes.
Why Is My Garbage Disposal Not Draining Water?
A clog or blockage often stops water from draining. Food scraps or debris may be stuck in the pipes or disposal.
Conclusion
A garbage disposal that won’t drain can cause major kitchen trouble. Start by cutting power to avoid accidents. Clear visible food or debris carefully with tools, not hands. Avoid harsh chemicals that can harm pipes and parts. Check the disposal’s reset button and manually turn blades if jammed.
Keep the P-trap clean to ensure smooth drainage. Regular maintenance helps prevent clogs and keeps water flowing. Simple steps can fix most drainage problems without costly repairs. Stay safe and take action early to keep your kitchen running well.