
Is your KitchenAid refrigerator light not working? When you open the door and the inside stays dark, it can be frustrating and make it harder to find what you need.
You might wonder if it’s just a simple bulb issue or something more serious. The good news is, most KitchenAid fridge lighting problems have easy fixes you can try yourself. Whether it’s a blown LED module, a stuck door switch, or a quick reset that’s needed, you don’t have to call a repair technician right away.
Keep reading to discover simple, step-by-step solutions to get your fridge light shining bright again—so you can see clearly and keep your kitchen running smoothly.
Common Light Issues
Common light problems in KitchenAid refrigerators often cause frustration. A dark fridge interior makes it hard to find items quickly. Several issues can lead to light failure. Understanding these can help in identifying the cause and fixing it.
Blown Led Modules
KitchenAid refrigerators use LED modules for lighting. These modules can burn out over time or due to moisture damage. A single blown LED module may cause all lights to go off. Check each LED board in both fridge and freezer sections. A dim or faint light on one board often indicates the faulty module. Replacing this module usually restores full lighting.
Faulty Door Switch
The door switch controls the light turning on and off. If the switch is broken or stuck, the light will not work. Sometimes the switch gets dirty or worn out. Testing the door switch with a multimeter can confirm if it is faulty. Replacing the door switch is a simple fix that often resolves light issues.
Control Board Problems
The control board manages various fridge functions, including lighting. A malfunctioning board can cause the lights to fail. Signs of control board issues include other electrical problems in the fridge. Diagnosing control board faults may require professional help. Repair or replacement of the control board can restore light operation.

Credit: www.kitchenaid.com
How Led Lights Work In Kitchenaid Fridges
KitchenAid refrigerators use LED lights for bright and efficient illumination. These LEDs last longer and consume less energy than traditional bulbs. The lights turn on automatically when the door opens. They provide clear visibility to find items easily inside the fridge.
LED lights in KitchenAid fridges are arranged on small circuit boards. These boards connect to the fridge’s power source and control system. If one LED or board fails, it can affect the whole lighting system. Understanding how these lights work helps in troubleshooting issues.
Series Wiring Impact
KitchenAid LED lights are often wired in a series. This means the electricity flows through each LED one after another. If one LED fails, the current stops flowing. As a result, all the lights on that circuit may go dark. This design saves space and wiring but can cause total light failure from one bad LED.
Series wiring makes it important to check each LED board. A single fault may cause multiple lights to stop working. Identifying the failed LED or board helps fix the issue quickly. It also prevents unnecessary replacement of all LED lights.
Signs Of A Failing Led Board
A failing LED board may show dim or flickering lights. Some LEDs might glow faintly while others stay off. The light may turn off completely even if the door is open. These signs indicate a problem with the LED board or its connection.
Moisture or damage inside the fridge can cause LED boards to fail. Loose wiring or faulty door switches can also affect the lighting. Checking these signs early helps prevent bigger problems. Repairing or replacing the LED board restores proper fridge lighting.
Checking The Door Switch
Checking the door switch is an important step when your KitchenAid refrigerator light is not working. The door switch controls the light by turning it on or off when you open or close the door. If this switch fails, the light may stay off even with the door open. Testing the door switch can help you find the cause of the problem and fix it quickly.
Locating The Switch
The door switch is usually near the door frame or the top corner inside the fridge. It looks like a small button or plunger. When you close the door, the door presses this switch to turn the light off. When you open the door, the switch releases and turns the light on. Check around the edges of the fridge door to find this switch. It is often white or black and easy to spot.
Cleaning And Testing
Dirt and debris can stop the door switch from working correctly. Use a soft cloth to clean around the switch. Remove any dust or sticky residue that may block the switch from moving freely. After cleaning, press the switch several times. You should hear a soft click each time. This sound means the switch is working properly.
To test the switch, open the fridge door and press the switch in by hand. The light should turn off. Release the switch, and the light should turn back on. If the light does not respond, the door switch may be faulty and need replacement. Testing the switch helps confirm if it is the cause of the light problem.
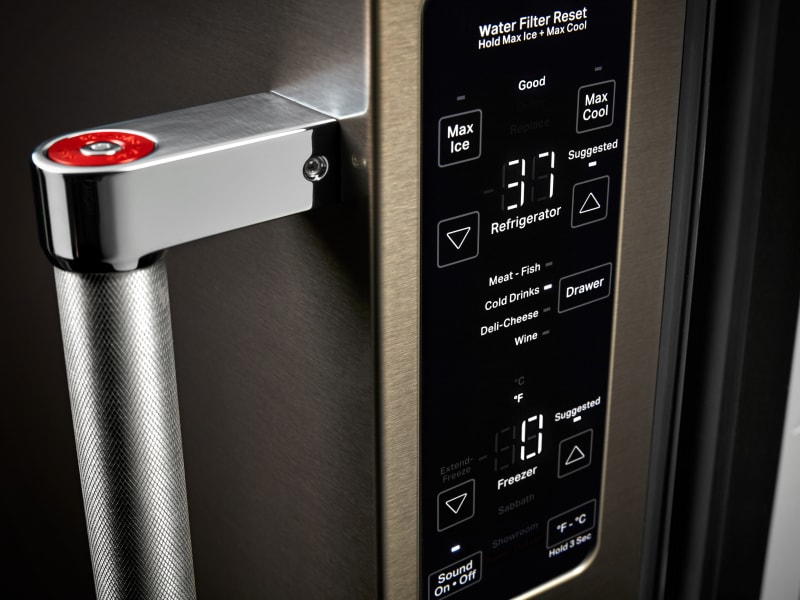
Sabbath Mode Effects
The Sabbath mode on KitchenAid refrigerators can affect the interior light. This mode is designed for use during the Jewish Sabbath and holidays. It disables certain functions that involve electricity. One common effect is that the refrigerator light does not turn on when the door opens.
This can cause confusion if you think the light is broken. Knowing how Sabbath mode works helps identify the real issue. It also shows how to restore normal operation when the mode is no longer needed.
How Sabbath Mode Works
Sabbath mode stops the refrigerator light from turning on. It also disables digital displays and sounds. The door switch still works, but it does not activate the light. This meets religious requirements by avoiding direct use of electricity.
Other features, like automatic defrost, may also pause during this mode. The fridge keeps the temperature stable. It only changes how electrical parts behave when the door opens.
Disabling Sabbath Mode
To turn off Sabbath mode, press the Sabbath button on the control panel. Hold it for a few seconds until the display returns to normal. The light will work again when the door opens.
Check your user manual for exact steps. Some models require different button combinations. Disabling Sabbath mode restores all normal functions, including the interior light.
Remember to disable this mode if you want the light to work normally. Leaving it on causes the light to stay off, which may seem like a problem.
Resetting Your Refrigerator
Resetting your KitchenAid refrigerator can fix minor issues like the light not working. It helps clear temporary glitches in the system. This process is simple and often restores normal function quickly. Resetting can save time and avoid calling for repairs.
Power Cycling Steps
Power cycling means turning off the refrigerator completely. First, unplug the fridge from the wall outlet. Wait for about five minutes to let the system reset. Then, plug it back in and turn it on. Check if the light inside the fridge works now. This step often fixes small electrical problems.
When To Reset The Control Board
Reset the control board if power cycling does not work. The control board manages many fridge functions, including the light. Look for error codes or unusual behavior before resetting. To reset, unplug the fridge for 10 minutes. Plug it back in and see if the light returns. If problems persist, consider professional help.
Replacing The Led Assembly
Replacing the LED assembly in your KitchenAid refrigerator restores proper lighting inside the unit. A faulty LED assembly often causes the light to fail. This part controls the bright, energy-efficient illumination in modern refrigerators.
Changing the LED assembly requires some basic tools and careful steps. Follow the instructions closely for a safe and effective replacement. The process takes about 15 to 30 minutes for most users.
Required Tools
- Phillips screwdriver
- Flathead screwdriver or plastic pry tool
- Replacement LED assembly specific to your KitchenAid model
- Gloves to protect your hands
- Flashlight (optional)
Safety Precautions
- Unplug the refrigerator before starting any repair.
- Wear gloves to avoid cuts from sharp edges.
- Work in a dry area to prevent electric shock.
- Do not force parts; use gentle pressure when removing components.
- Keep screws and small parts in a safe place.
Step-by-step Replacement Guide
- Unplug the refrigerator from the power outlet.
- Open the fridge door and locate the LED light cover.
- Use a flathead screwdriver or pry tool to remove the cover gently.
- Unscrew the LED assembly mounting screws with a Phillips screwdriver.
- Disconnect the LED assembly’s electrical connector carefully.
- Remove the old LED assembly from its position.
- Connect the new LED assembly to the electrical connector.
- Secure the new assembly with mounting screws.
- Snap the light cover back into place.
- Plug the refrigerator back in and test the new light.
Testing Led Boards
Testing LED boards helps find why a KitchenAid refrigerator light is not working. Check each LED board for damage or dim spots. Faulty boards often cause all lights to go out.
Identifying Faulty Boards
Testing LED boards helps find the cause of the light issue. KitchenAid refrigerators use LED boards inside the fridge and freezer. A single bad board can cause all lights to go out. Check each LED board for signs of damage or malfunction. Look for boards that are not lighting up at all or show very dim light. Faulty boards often appear darker or have no glow compared to working ones.
Using Visual Indicators
Visual cues are a simple way to test LED boards. Turn the refrigerator light circuit on and watch the LED boards closely. Working boards emit a steady, bright light. Faulty boards may flicker, glow faintly, or stay completely dark. Also, check for any burnt spots or corrosion on the board surface. These signs suggest the board needs replacement. Using visual inspection saves time before using tools like multimeters.
Credit: www.kitchenaid.com
When To Call A Technician
Knowing when to call a technician is key if your KitchenAid refrigerator light stops working. Some problems need expert care to avoid more damage or safety risks. Timely professional help ensures your fridge stays in good shape and your food stays fresh.
Using Kitchenaid Service Locator
KitchenAid offers a service locator to find authorized repair professionals near you. Enter your zip code or city to get a list of technicians. These experts have training specific to KitchenAid appliances. They use genuine parts for lasting repairs. Using the service locator saves time and guarantees quality service.
Signs You Need Professional Help
Check for these signs before calling a technician:
- The light stays off after replacing bulbs or fuses.
- You hear unusual noises from the fridge.
- The door switch feels loose or broken.
- The interior light flickers or dims irregularly.
- There is moisture or corrosion near the light module.
- The fridge shows error codes or stops cooling properly.
These issues often require special tools and skills. Trying to fix them yourself may cause more damage. A technician can diagnose and fix the root cause quickly and safely.

Credit: www.youtube.com
Frequently Asked Questions
Why Is The Light Off In My Kitchenaid Refrigerator?
The KitchenAid refrigerator light may be off due to a blown LED module, faulty door switch, or control board issue. Check the door switch for dirt or sticking. Reset the fridge by unplugging it briefly. Replace the LED assembly if the light remains off after troubleshooting.
How To Replace Led Light On Kitchenaid Refrigerator?
Unplug the refrigerator for safety. Remove the LED module using a flathead screwdriver or putty knives. Disconnect the wire harness, then connect and install the new LED light. Plug the fridge back in and test the light.
How Do I Reset My Kitchenaid Refrigerator?
To reset your KitchenAid refrigerator, unplug it for 5 minutes, then plug it back in. This restarts the control board and clears minor errors.
Will My Fridge Still Work If The Light Is Broken?
Your fridge will still run if the light is broken. The light doesn’t affect cooling or operation.
Why Is My Kitchenaid Refrigerator Light Not Working?
The light may be off due to a blown LED module or a faulty door switch. Moisture or wiring issues can also cause the light to stop working. Check these parts first to diagnose the problem.
Conclusion
KitchenAid refrigerator light issues often have simple fixes. Check the door switch and clean it if needed. Test the LED modules for any signs of damage. Replacing a faulty light or switch usually restores brightness quickly. Remember, the fridge still works even if the light is off.
Regular maintenance helps prevent light problems. Don’t ignore unusual signs; early action saves time and money. Follow these easy steps to keep your KitchenAid fridge well-lit and running smoothly.