
Are you struggling with your hanging indent not working in PowerPoint? You’re not alone.
Many users find it confusing when their carefully formatted text just won’t line up the way they want. Whether you’re preparing a presentation for work, school, or a project, a messy indent can throw off the entire look and feel.
But don’t worry—fixing this issue is easier than you think. In this guide, you’ll discover the simple steps to get your hanging indent working perfectly, common mistakes to avoid, and quick tips that save you time. Keep reading, and you’ll have your text looking sharp in no time.
Common Hanging Indent Issues
Hanging indents in PowerPoint can sometimes act unpredictably. Certain common issues often cause the indent not to work as expected. Identifying these problems helps fix them quickly. Understanding these issues lets you format your slides neatly and professionally.
Bulleted Lists Overriding Indents
Bulleted lists have built-in indents that override manual hanging indents. When you apply a bullet point, PowerPoint controls the spacing automatically. This control stops your hanging indent from showing correctly. To fix this, remove the bullet formatting first. Then, apply the hanging indent and adjust spacing with tabs or the ruler.
Incorrect Ruler Marker Usage
PowerPoint’s ruler has multiple markers controlling text indents. The top triangle controls the first line indent. The bottom triangle controls the hanging indent. Dragging the wrong marker changes the wrong indent. Many users move the top marker when they want a hanging indent. Use the bottom marker to adjust hanging indents accurately.
Multiple Paragraphs In Text Box
A hanging indent applies to a single paragraph at a time. If your text box has multiple paragraphs, the indent only affects the active paragraph. This can cause confusion when the indent seems inconsistent. Select the entire text or each paragraph separately. Apply the hanging indent to each paragraph to keep the formatting uniform.

Credit: superuser.com
Using Paragraph Settings
Adjusting paragraph settings can fix hanging indent problems in PowerPoint. This method gives precise control over text indentation. It works well when the ruler or bullet points cause issues. Follow simple steps to access and set paragraph indents properly.
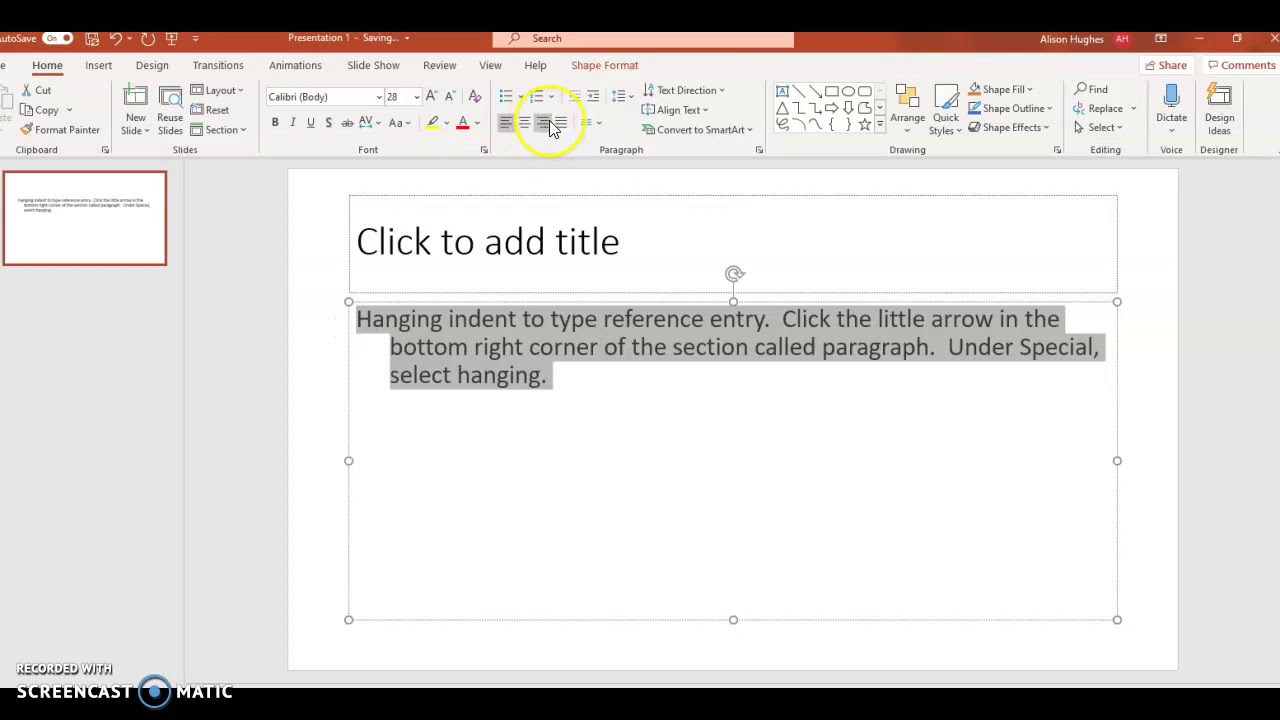
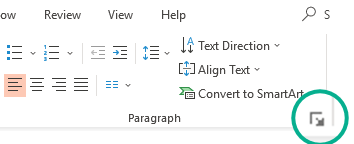
Accessing Paragraph Dialog Box
Select the text needing a hanging indent first. Next, go to the Home tab on the ribbon. Find the Paragraph group and click the small arrow at the corner. This opens the Paragraph dialog box where indent options appear.
Setting Before Text And Hanging Indents
Inside the dialog box, locate the Indentation section. Set the “Before text” value to control the main indent distance. Then, open the “Special” dropdown menu and select “Hanging.” This applies the hanging indent effect to the paragraph.
Applying Changes Correctly
After setting the indents, click OK to save changes. Check the text box to see the hanging indent in effect. If it does not appear, ensure the text is not in a bullet list. Bullet points can override paragraph indent settings.
Adjusting Indents With The Ruler
Adjusting indents with the ruler in PowerPoint offers precise control over text layout. This method helps fix issues when hanging indents do not work properly. Using the ruler, users can visually manage where the first line starts and where the rest of the paragraph aligns. This tool is especially helpful for creating professional slides with clean text alignment.
Enabling The Ruler View
The ruler may not be visible by default in PowerPoint. To enable it, go to the View tab. Check the box labeled “Ruler.” The horizontal and vertical rulers will appear around your slide. These rulers help guide text positioning and indentation. Turning on the ruler is the first step to adjusting indents manually.
Moving First Line And Hanging Indent Markers
The ruler shows two small markers on the left side: the top triangle and the bottom triangle. The top triangle controls the first line indent. The bottom triangle controls the hanging indent. Drag the top triangle to set where the first line begins. Drag the bottom triangle to adjust the indent of all other lines in the paragraph. Moving these markers changes the paragraph’s indentation visually.
Aligning Indents For Proper Formatting
For a proper hanging indent, the bottom triangle should be moved right, away from the top triangle. This creates an offset for all lines except the first. Make sure the first line marker stays at the left margin or where you want the line to start. Check the text box width and spacing to avoid overlapping or uneven text. Aligning these markers correctly ensures clean, readable text formatting on your slides.
Dealing With Bullet Points
Bullet points often cause trouble with hanging indents in PowerPoint. The program applies its own spacing rules to bulleted lists. This can stop custom indents from working as expected. Understanding how bullet formatting interacts with indents helps fix these issues. You can then create neat, well-structured lists in your slides.
Turning Off Bullet Formatting
PowerPoint applies automatic indentation when bullet points are active. This can block your hanging indent settings. To fix this, first select your bulleted text. Then go to the Home tab and click the Bullets button to turn off bullet formatting. Now, your text is plain and ready for custom indents. This step removes the built-in bullet indent conflicts.
Using Tabs To Create List Levels
With bullets off, you can use the Tab key to create list levels. Press Tab once to indent a line and create a sub-level. Press Shift + Tab to move back a level. This manual method controls list structure without bullet formatting. It lets you adjust indentation freely and keeps your hanging indents intact. Tabs are simple and effective for managing list depth.
Managing Bullet Indentation Conflicts
Bullet points and hanging indents both try to control spacing. This often causes conflicts that break your formatting. Turning off bullets removes one source of conflict. Using tabs controls indentation without interference. Also, check the ruler for any markers causing unwanted indents. Adjust or reset those markers to match your desired layout. These steps prevent PowerPoint from overriding your indent settings.
Quick Keyboard Shortcuts
Quick keyboard shortcuts save time and reduce errors in PowerPoint. They help apply hanging indents faster. Using shortcuts avoids digging through menus. This section covers simple keys to fix hanging indent issues quickly.
Applying Hanging Indent Via Shortcut
Select the text box or paragraph first. Press Ctrl + T to create a hanging indent. This shortcut moves all lines except the first one inward. It works only if the text is a single paragraph without bullets. Repeat the shortcut to increase the indent size step-by-step. For most users, this is the fastest way to apply hanging indents.
Navigating Paragraph Options Quickly
Open the Paragraph dialog box without using a mouse. Press Alt + H, then PG on the keyboard. This opens paragraph settings directly. Use the arrow keys to select “Special” under indentation. Choose “Hanging” and set the indent size with arrow keys. Press Enter to apply. This method gives more control over indent measurements. It helps when shortcuts alone do not work.
Credit: www.youtube.com
Tips For Consistent Formatting
Maintaining consistent formatting in PowerPoint slides improves readability and professionalism. Using hanging indents correctly helps organize text neatly. These tips focus on methods to keep your indents uniform across multiple paragraphs. Follow these simple steps to avoid common issues and save time on formatting.
Applying Indents To Multiple Paragraphs
Select all paragraphs you want to format before applying indents. Use the ruler or paragraph settings to set the hanging indent once. This applies the indent to every selected paragraph, keeping them aligned. Avoid formatting each paragraph separately to maintain consistency. Check that the text is not part of a bulleted list, as bullets can override indent settings.
Avoiding Common Formatting Mistakes
Do not mix tabs and spaces for indentation; use the ruler or paragraph dialog box. Turn off bullet points before setting hanging indents to prevent conflicts. Ensure each paragraph is a single block of text without manual line breaks inside. Avoid copying text from other sources with hidden formatting that may disrupt your indents. Confirm your indent values are set correctly in the paragraph settings.
Using Templates For Repeated Use
Create a slide template with preset hanging indents for text boxes. Save the template to reuse it in future presentations. This saves time and ensures uniform formatting across all slides. Customize the template for different slide layouts while keeping indent styles consistent. Using templates prevents the need to adjust indents manually each time.
Troubleshooting Persistent Problems
Persistent issues with hanging indents in PowerPoint can disrupt your slide design. Troubleshooting these problems helps ensure your text looks neat and professional. Follow clear steps to identify and fix common causes of hanging indent errors.
Resetting Paragraph Formatting
Select the problematic text first. Navigate to the Home tab and open the Paragraph settings. Click “Reset” or manually clear all indentation values. This action removes any conflicting formats. Apply the hanging indent again after the reset. This step often clears hidden formatting problems.
Checking For Hidden Formatting Marks
Hidden marks can block proper indentation. Turn on the Show/Hide formatting marks option. Look for extra paragraph breaks or tabs within your text. Remove unwanted marks that might affect indentation. Clean text ensures PowerPoint applies hanging indents correctly.
Updating Powerpoint To Latest Version
Older PowerPoint versions may have bugs causing indent issues. Check for updates in the Help or Account menu. Install the latest updates to improve performance. Updated software often fixes known problems with formatting features.
Credit: support.microsoft.com
Frequently Asked Questions
Why Are My Hanging Indents Not Working?
Hanging indents fail if bullet points are active or text spans multiple paragraphs. Disable bullets and apply both “Before text” and “Hanging” indent settings in Paragraph options. Adjust the ruler markers correctly to fix indentation conflicts.
How To Get Hanging Indent In Powerpoint?
Select the text box and highlight the text. Open Paragraph settings from the Home tab, choose “Hanging” under Special, set the indent size, and click OK. Turn off bullet points if active, as they override hanging indents. Use the ruler to fine-tune indentation.
What Does Ctrl+k Do In Powerpoint?
Ctrl+K in PowerPoint opens the Insert Hyperlink dialog box. It allows you to add or edit hyperlinks on selected text or objects.
How To Apply A 0.5 In Hanging Indent?
Highlight your text, open Paragraph settings from the Home tab, select “Hanging” under Special, enter 0. 5″, and click OK.
Why Is My Powerpoint Hanging Indent Not Working?
PowerPoint hanging indents often fail if bullet points are active. Turn off bullets and apply hanging indent in paragraph settings instead.
Conclusion
Troubles with hanging indents in PowerPoint often come from simple settings. Check for bullet points and turn them off if needed. Use the ruler carefully to adjust indents step-by-step. Always set both “Before text” and “Hanging” values in Paragraph options.
These small changes help your text look clean and professional. Practice these tips, and your PowerPoint slides will look better every time. Keep trying until the indent works just right.