
Is your Bostitch stapler suddenly refusing to work just when you need it most? It’s frustrating when your trusted tool jams, won’t staple, or just clicks without firing a staple.
But don’t worry—you’re not alone, and the fix might be simpler than you think. You’ll discover easy, step-by-step solutions to get your Bostitch stapler back in action quickly. Whether it’s a jam, a power issue, or a mechanical glitch, we’ll guide you through practical tips that save time and avoid costly repairs.
Keep reading, and you’ll be stapling smoothly again in no time!
Check For Staple Jams
Checking for staple jams is a key step when your Bostitch stapler stops working. Jams block the staple path, preventing staples from firing. Clearing jams restores smooth stapling and avoids damage. Follow these simple steps to find and remove jammed staples safely.
Open The Magazine
First, locate the magazine release button or tabs. Press or pinch them to open the stapler’s loading tray. Remove any loose staples inside. This gives clear access to the jammed area.
Inspect The Throat
Look into the stapler’s throat, where staples exit. Check for bent or stuck staples blocking the path. A jammed staple often lies deep inside this slot. Use a good light for better visibility.
Remove Jammed Staples
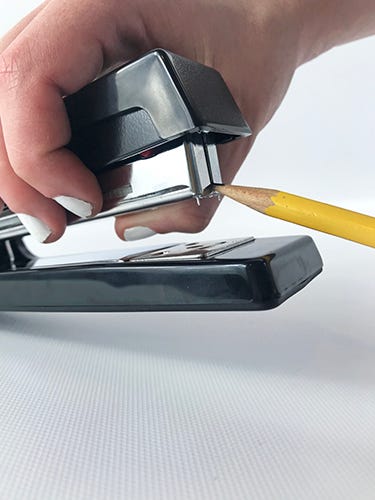
Use a pen tip, paperclip, or tweezers to pry out the stuck staples. Gently lift or pull the jammed pieces without forcing the stapler open. Clear all fragments to prevent new jams. After removal, test the stapler to ensure it fires smoothly.
Load Staples Correctly
Loading staples correctly is key to fixing a Bostitch stapler that won’t work. Staples must be placed with care to avoid jams and misfires. Small mistakes in loading cause big problems. Follow simple steps to make sure your stapler runs smoothly every time.
Proper Staple Orientation
Staples need to face the right way for the stapler to work. Place the strip of staples with the open ends pointing down. This means the legs of the staples should face the base of the stapler. If staples are upside down, the stapler will not feed them properly.
Check that the staples lie flat in the magazine. Bent or misaligned staples cause jams. Do not overload the tray with too many staples. Use the correct size of staples made for your Bostitch model.
Check Spring Tension
The spring inside the stapler pushes the staples forward. Remove the staples and slide the pusher back and forth to test movement. It should move smoothly without sticking. A stuck spring can block staples from feeding.
If the spring feels tight or stuck, add a small pinch of dry lubricant like graphite powder. Avoid oil or wet lubricants as these attract dust. Proper spring tension ensures staples feed consistently and the stapler works without trouble.
Inspect Power Source
Inspecting the power source is a key step when your Bostitch stapler stops working. Without proper power, the stapler will fail to operate. This check is simple but often overlooked. It can save time and avoid unnecessary repairs. Focus on the electric connection and safety sensors. Both play a crucial role in the stapler’s function.
Verify Electric Connection
Start by confirming the stapler is plugged in firmly. Loose plugs can cause power interruptions. Try unplugging and plugging it back into the outlet. Check if the outlet has power by testing with another device. Avoid using extension cords as they might cause power drops. Look for any visible damage to the power cord. Frayed or cut cords can stop electricity flow. If the cord looks damaged, replace it immediately. A steady power connection is vital for your stapler’s performance.
Test Safety Sensors
Many Bostitch electric staplers have built-in safety sensors. These sensors prevent the stapler from firing unless paper is inserted correctly. Insert the paper fully into the stapler slot. If the stapler still does not work, the sensor might be dirty or faulty. Wipe the sensor area gently with a dry cloth. Dirt or dust can block the sensor’s signal. If cleaning does not help, the sensor may need professional repair. Safety sensors ensure safe operation but can cause issues if they fail.
Credit: bostitchoffice.com
Maintain Pneumatic Tools
Maintaining pneumatic tools is essential for the smooth operation of your Bostitch stapler. These tools rely on compressed air to drive staples accurately. Regular care prevents common issues like poor stapling or tool failure. Simple maintenance tasks can extend the life of your stapler and keep it working reliably.
Add Pneumatic Oil
Adding pneumatic oil keeps the internal parts lubricated and prevents wear. Use only oil designed for pneumatic tools. Add a few drops into the air inlet before use. This reduces friction and stops rust from forming inside. Regular oiling improves air flow and tool performance.
Check Driver Blade
The driver blade pushes staples into the material. Over time, it can wear or bend, causing jams or misfires. Inspect the blade for damage or dirt buildup. Clean it gently with a soft cloth. Replace the blade if it looks worn or chipped. A healthy driver blade ensures smooth stapling every time.
Fix Common Mechanical Issues
Fixing common mechanical issues can restore your Bostitch stapler’s performance quickly. Most problems happen due to jams or lack of lubrication. These issues stop the stapler from working smoothly. Simple steps can clear jams and keep parts moving freely. Regular care prevents bigger problems. Focus on clearing stuck parts and applying the right lubricant.
Clear Stuck Driver
A stuck driver often blocks staples from firing. Open the stapler’s magazine by pressing the release button or squeezing the back tabs. Remove any loose staples carefully. Look into the throat of the stapler where staples exit. Use a pen tip, paperclip, or tweezers to pry out any bent or jammed staples. Make sure no pieces are left inside. Check that the driver moves up and down freely. If it stays stuck, gently wiggle it to loosen.
Apply Dry Lubricant
Dry lubricant helps the stapler’s moving parts slide smoothly. Avoid oily lubricants because they attract dust and dirt. Use graphite powder or a silicone-based dry spray. Apply a small amount to the driver track and the spring-loaded guide. Move the parts back and forth to spread the lubricant evenly. This reduces friction and prevents sticking. Regular lubrication keeps your stapler working longer and more reliably.

Credit: www.reddit.com
Use Firm Stapling Technique
Using a firm stapling technique is key for your Bostitch stapler to work properly. Light or weak pressure may cause staples to not penetrate the paper fully. Applying steady, strong force helps the staple punch through and fold securely.
Many stapler issues come from not pressing down hard enough. The stapler needs a solid push to drive the staple completely. Without this, staples can jam or only partially insert, causing frustration.
Position The Stapler Correctly
Place the stapler flat and stable on the surface. Hold the papers tightly together to avoid slipping. Align the stapler where you want the staple to go. This ensures the staple hits the right spot with enough force.
Use Consistent, Strong Pressure
Press down firmly and evenly on the stapler handle. Avoid quick or jerky motions. A slow, steady push drives the staple fully through the sheets. This reduces jams and incomplete staples.
Check Stapler Mechanism Movement
Make sure the stapler handle moves smoothly. Resistance or stiffness can prevent firm stapling. If needed, clean or oil the moving parts lightly. Smooth operation helps apply the right pressure without extra effort.
Practice Proper Paper Thickness
Do not staple too many sheets at once. Thick stacks require more force and can jam the stapler. Use fewer pages for a firm staple with less effort. This keeps the stapler working well longer.
When To Seek Professional Help
Sometimes, simple fixes do not solve Bostitch stapler problems. Knowing when to seek professional help can save time and frustration. Professional support ensures your stapler gets the right care. It also protects your stapler’s warranty and longevity.
Visit Bostitch Support
Bostitch Support offers expert advice for stapler issues. Contact them for troubleshooting steps that match your model. They can guide you through complex problems safely. Support staff can help with warranty claims too. This option suits users who want reliable, official help.
Order Replacement Parts
Staplers may stop working due to worn or broken parts. Ordering genuine Bostitch replacement parts keeps your tool working smoothly. Parts like springs, drivers, and magazines fit perfectly and last longer. Use parts recommended by Bostitch to avoid damage. Replacing parts yourself can fix stubborn problems without professional repair costs.
Find Service Centers
Authorized Bostitch service centers provide full repairs and maintenance. Skilled technicians use proper tools and parts for your stapler. Service centers handle complex issues that DIY cannot fix. They also inspect the stapler for hidden problems. Visiting a service center ensures your stapler returns in top shape.

Credit: www.youtube.com
Frequently Asked Questions
Why Doesn’t My Bostitch Stapler Work?
Check for staple jams by opening the magazine and removing stuck staples. Verify power or air supply is active. Ensure staples load correctly and apply lubricant if needed. Test driver blade function. Visit Bostitch Support for manuals or parts if problems continue.
Why Is My Stapler Not Stapling?
Your stapler may not staple due to a jammed staple, empty staple strip, or misaligned staples. Check for jams, reload staples properly, and ensure the stapler is pressed firmly. For electric or pneumatic staplers, verify power or air supply is active.
How Do I Unjam My Bostitch Stapler?
Open the magazine by pressing the release button. Remove loose staples and pry out jammed staples with tweezers. Check staple orientation and spring tension. For pneumatic models, add oil. Reassemble and test the stapler.
Why Is My Staple Gun Not Shooting Out Staples?
Your staple gun might not shoot staples due to a jam, empty magazine, or incorrect staple loading. Check air or power supply for pneumatic or electric models. Clean the track and ensure proper staple orientation to fix the issue.
Why Is My Bostitch Stapler Not Stapling Properly?
Staple jams are the most common cause. Check for stuck or bent staples inside the magazine. Clear any blockages carefully to restore function.
Conclusion
A Bostitch stapler that won’t work often has simple fixes. Check for jams and clear any stuck staples carefully. Make sure the power or air supply is connected and strong. Load staples correctly and keep the tool clean and oiled.
Small steps like these usually solve the problem fast. If troubles continue, find help on the official Bostitch Support site. Keeping your stapler in good shape helps it work every time you need it.