
If you’ve set up your home theater with an Onkyo receiver, you expect everything to work smoothly. But sometimes, the picture from your receiver just won’t show up on your TV. The screen is black, or maybe you get a “No Signal” message. This can be frustrating, especially after spending time and money on good equipment. The good news is: most display issues with Onkyo receivers have clear causes and practical solutions. This article will guide you through every possible reason why your Onkyo receiver is not displaying on your TV, step-by-step troubleshooting, advanced fixes, and some expert tips that even experienced users overlook.
Why Your Onkyo Receiver Isn’t Displaying On Tv
Before you jump to advanced troubleshooting, it’s important to understand what might be causing the issue. The connection between your Onkyo receiver and your TV can break down in several places. Knowing these common causes helps you fix the problem faster, and sometimes, prevent it from happening again.
Common Causes
- Loose or faulty HDMI cables
- Wrong input selection on the TV or receiver
- HDMI handshake problems
- Receiver settings misconfiguration
- Outdated firmware
- Incompatible resolution or video format
- HDMI port damage
- TV settings not correct
- Power or hardware failure in the receiver
- HDCP (copy protection) issues
How Do Display Problems Show Up?
- TV shows “No Signal”
- TV screen is black or flickers
- Receiver’s display panel works, but no picture on TV
- Video is unstable or distorted
- Audio works, but no video
Knowing these symptoms and causes helps you narrow down the exact problem.
Basic Troubleshooting Steps
Let’s start with the simplest fixes. Most display problems with Onkyo receivers are solved by these steps. Don’t skip them—even experienced users sometimes miss the basics.
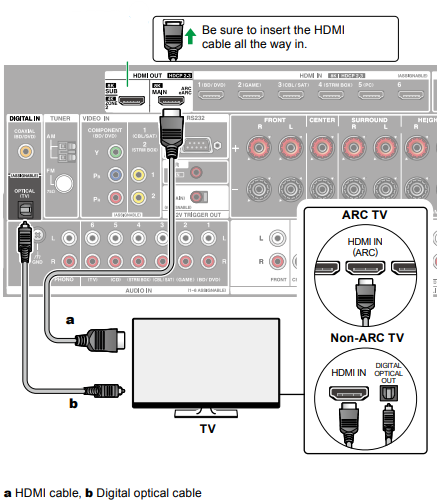
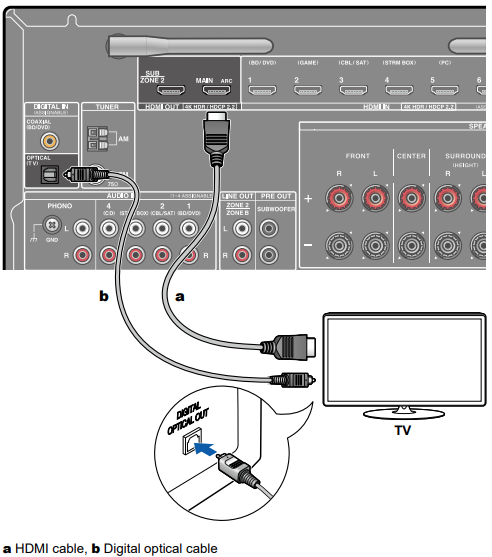
1. Check Hdmi Cable Connections
Loose or bad HDMI cables are the most common cause of display issues.
- Unplug and firmly re-insert both ends of the HDMI cable (receiver and TV).
- Check for any bent or damaged pins on the connectors.
- Try a different HDMI cable, preferably one that you know works.
- Avoid using overly long HDMI cables (over 15 ft) without a signal booster.
2. Verify Tv Input Selection
Sometimes, the TV is set to the wrong HDMI input.
- Use the TV remote to cycle through HDMI inputs (HDMI1, HDMI2, etc. ).
- Check if your Onkyo receiver is connected to the selected input.
- On some smart TVs, input names can be changed—double-check the input label.
3. Confirm Receiver’s Output Settings
Your Onkyo receiver may have multiple HDMI outputs.
- Make sure your TV is connected to the correct HDMI OUT port.
- Some Onkyo models have MAIN and SUB HDMI outputs. Use MAIN for video.
- On the receiver remote, look for a button labeled “HDMI Out” or similar and try switching outputs.
4. Power Cycle All Devices
A simple restart can resolve many “handshake” and communication issues.
- Power off your TV, Onkyo receiver, and all connected devices.
- Unplug them from the wall for 1-2 minutes.
- Plug everything back in and power on (TV first, then receiver, then other devices).
5. Test With A Different Source Device
Connect a different source (like a Blu-ray player or streaming stick) to your receiver’s HDMI input.
- If the new device works, the problem may be with your original source.
- If not, focus on the receiver or TV.
Intermediate Troubleshooting: Digging Deeper
If the basic steps don’t work, it’s time to look deeper. These fixes require more attention, but they solve most stubborn display issues.
Hdmi Handshake And Hdcp Issues
Modern AV receivers and TVs use a system called HDMI handshake to communicate and agree on video settings. Problems here are common.
- Unplug and reconnect HDMI cables while all devices are powered off.
- Try different HDMI ports on both TV and receiver.
- Disable or enable CEC (Consumer Electronics Control) on both TV and receiver. Sometimes CEC causes handshake problems.
Update Onkyo Receiver Firmware
Outdated firmware can cause compatibility issues with TVs and new devices.
- Visit the Onkyo support website for your receiver’s model.
- Download the latest firmware and update using USB or network (follow Onkyo’s instructions).
- Firmware updates can fix HDMI and HDCP bugs.
Reset Video Output Settings On Onkyo Receiver
Sometimes, the receiver’s video settings are set to a format your TV cannot display.
- On your Onkyo remote, press “Setup”.
- Go to Hardware Setup > HDMI.
- Set video output resolution to Auto or a known compatible format (e.g., 1080p).
- If you can’t see the Onkyo menu, use the receiver’s front panel to reset video settings to default (check your manual for your model’s button combination).
Test For Hdmi Port Damage
Sometimes, a specific HDMI port is faulty.
- Try a different HDMI OUT port on the receiver (if available).
- Try a different HDMI IN port on your TV.
- If only one port works, the faulty port may need repair.
Advanced Troubleshooting: Special Cases
If you’re still not getting a picture, these more advanced fixes might help. They require patience and sometimes technical knowledge.
Factory Reset The Onkyo Receiver
A factory reset will erase all custom settings, but it can fix deep configuration errors.
- Each Onkyo model has a different reset method. Usually, you:
- Turn off the receiver.
- Hold down the “VCR/DVD” button (or similar) while pressing ON/STANDBY.
- “Clear” should appear on the display, then the receiver resets.
- After resetting, re-do your HDMI setup.
Check Tv Firmware And Settings
TVs sometimes need firmware updates too.
- Check your TV’s support page for updates.
- Update firmware using USB or network.
- In TV settings, look for HDMI-related options like “Input Signal Plus” (Samsung), “HDMI Ultra HD Deep Color” (LG), or similar. Try toggling these settings.
Confirm Video Format Compatibility
If you set your Onkyo receiver to output 4K or HDR, but your TV only supports 1080p, you’ll get a blank screen.
- Set the receiver’s output to a lower resolution (try 1080p).
- If you have a universal remote, use its menu to force standard resolution.
Use The Correct Hdmi Port Features
Some TVs have “game” or “PC” HDMI ports that behave differently.
- Check your TV manual to see which HDMI ports support ARC, 4K, or other features.
- Use the correct port for your receiver.
Real-world Example: Diagnosing A Persistent Display Problem
Let’s look at a practical scenario to see how these troubleshooting steps play out.
Situation:
You’ve just upgraded your TV. Your Onkyo TX-NR595 receiver worked fine with your old TV, but with the new one, you get “No Signal. ”
Steps taken:
- Swapped HDMI cables—no luck.
- Tried all HDMI inputs on the TV—still nothing.
- Updated firmware on both TV and receiver—no change.
- Set receiver’s video output to 1080p—TV finally displays the picture.
Lesson:
The new TV did not support the receiver’s default 4K output format. Resetting to 1080p solved the issue.
Data Table: Common Causes And Solutions
Below, you’ll see a quick comparison of common causes, their symptoms, and recommended solutions.
| Problem | Symptom | Solution |
|---|---|---|
| Loose HDMI Cable | No Signal, Black Screen | Reconnect/replace HDMI cable |
| Wrong Input Selected | No Signal | Select correct HDMI input on TV |
| HDMI Handshake Issue | Intermittent display, Flicker | Power cycle devices, check CEC |
| Receiver Output Setting | Blank screen, Audio but no video | Set output to compatible resolution |
| Firmware Outdated | Random display issues | Update firmware |
| HDMI Port Damage | One port works, others don’t | Use working port, consider repair |
Expert Insights: Tips Most People Miss
Even experienced users sometimes overlook these less obvious solutions:
1. Use High-quality Hdmi Cables
Cheap or old HDMI cables may not support 4K, HDR, or ARC features, causing display problems. Always use a certified high-speed HDMI cable (look for “Premium Certified” logos).
2. Avoid Hdmi Splitters And Switches (if Possible)
Third-party splitters, switches, or adapters can cause handshake and HDCP problems. Whenever possible, connect the receiver directly to the TV.
3. Check For Power Save Or Eco Modes
Some Onkyo receivers have ECO or power-saving modes that may disable video output after a period of inactivity. Turn off these modes in the receiver’s settings if you experience random display loss.
4. Don’t Forget About Hdmi-cec
HDMI-CEC can be useful for controlling devices with one remote. But on some setups, it causes handshake failures or devices turning off unexpectedly. If you have odd issues, try disabling CEC on both your TV and receiver.
5. Use The Onkyo Osd (on-screen Display)
If you can see the Onkyo OSD menu but no other video, the problem is likely with the source device or video signal, not the receiver or TV connection.
Advanced Table: Hdmi Features And Compatibility
Understanding which HDMI features your devices support can prevent issues. Here’s a comparison of common HDMI features and their impact.
| HDMI Feature | Supported by Most Onkyo Receivers | TV Requirement | Common Issues if Unsupported |
|---|---|---|---|
| 4K Video | Yes, on newer models | TV must support 4K input | No picture or downscaled video |
| HDR | Yes, on select models | TV must support HDR | Washed-out colors or no video |
| ARC/eARC | Yes (varies by model) | TV must support (e)ARC | No audio or video passthrough |
| HDCP 2.2 | Yes, on new receivers | TV must support HDCP 2.2 | “No Signal” or error message |
When To Contact Professional Support
If you have tried all troubleshooting steps and still don’t see a picture, it may be time to seek professional help.
- Contact Onkyo customer support with your model and problem description.
- If your receiver is under warranty, do not open the case or attempt repairs yourself.
- If you suspect HDMI port damage, a qualified technician can test or repair the board.
Preventing Future Display Problems
Taking simple precautions can help you avoid HDMI display issues in the future.
- Use surge protectors to prevent power spikes from damaging HDMI ports.
- Label your HDMI cables and inputs so you always know what goes where.
- Update firmware regularly on all your devices.
- Avoid moving equipment while cables are plugged in to prevent loosening ports.
- Invest in quality cables for the best long-term performance.
Quick Reference: Troubleshooting Flowchart
Here’s a summarized troubleshooting flow, perfect for quick checks:
- No picture? Check HDMI cable and TV input.
- Still no picture? Power cycle all devices.
- Test with a different HDMI cable and port.
- Update firmware on receiver and TV.
- Set receiver output to 1080p.
- Try direct connection (bypass splitters/adapters).
- Factory reset receiver if nothing works.
Comparison Table: Onkyo Receiver Models And Hdmi Output Features
If you’re planning to upgrade or replace your receiver, consider the HDMI features you need. Here’s a quick comparison of common Onkyo models and their HDMI capabilities.
| Model | Max Video Resolution | HDCP Version | ARC/eARC | Number of HDMI Outputs |
|---|---|---|---|---|
| TX-NR696 | 4K/60Hz | 2.2 | ARC | 2 |
| TX-NR777 | 4K/60Hz | 2.2 | ARC | 2 |
| TX-RZ50 | 8K/60Hz | 2.3 | eARC | 2 |
| TX-SR393 | 4K/60Hz | 2.2 | ARC | 1 |

Practical Example: Fixing A “no Signal” Issue Step-by-step
Let’s walk through a quick real-world fix:
Situation:
You connect your Onkyo receiver to a Samsung TV. You see “No Signal. ”
Step-by-step fix:
- Unplug and replug HDMI cable at both ends.
- Confirm TV is set to the correct HDMI input (use TV remote).
- Power off both TV and receiver, unplug for 1 minute, then restart.
- Change the HDMI cable to a new one (certified high-speed).
- Update the receiver’s firmware from the Onkyo website.
- Go into the TV’s settings and enable “Input Signal Plus” for the HDMI port.
- Set the Onkyo receiver’s output to 1080p from the front panel.
After these steps, the TV displays the receiver’s output.
Non-obvious insight: Sometimes, TV input enhancements (like “Input Signal Plus” or “HDMI UHD Deep Color”) must be enabled for the port you’re using, or the TV will not accept the signal.
Frequently Asked Questions
Why Does My Onkyo Receiver Show Sound But Not Video?
This often means the video signal is not reaching the TV, while audio is passing through. Check the HDMI cable and ensure the receiver’s video output is set to a compatible resolution. If your TV supports only 1080p but the receiver outputs 4K, you may get sound but no picture.
How Can I Tell If My Hdmi Cable Is Faulty?
If wiggling the cable causes the picture to flicker or appear, or if another cable works but yours does not, the cable is likely faulty. Certified high-speed HDMI cables are more reliable for 4K video.
What Is Hdmi Handshake, And How Does It Cause Issues?
HDMI handshake is the process where devices communicate to agree on video and audio formats. If the handshake fails, you get no signal or errors. Power cycling all devices often resets the handshake and fixes the issue.
Should I Update Firmware On My Onkyo Receiver?
Yes. Firmware updates fix bugs and add compatibility for new TVs and formats. Always use the official Onkyo site. You can find updates and instructions at the Onkyo official download page.
Is It Safe To Factory Reset My Receiver?
A factory reset is safe, but it erases all your settings. Use it as a last resort when nothing else works. You’ll need to set up inputs, outputs, and audio again after the reset.
Getting your Onkyo receiver to display on your TV can take some trial and error, but with a careful, step-by-step approach, most problems are easily fixed. Remember, start with the basics, check cables and settings, and update your firmware. If all else fails, professional support is just a call away. With a little patience, your home theater will be back to perfect working order.